Tester
Every new feature and bug fix released in Mautic undergoes testing and code review by community members before it’s included in a release.
Mautic is always looking out for people to help with these processes. Even if you can spare an hour or two a week, it significantly increases the number of bugs and features that reach the hands of Mautic users.
Mautic maintains Open Source Fridays board, which shows you a list of all of the bugs and features that need to get tested.
There are two ways to set up your testing environment:
On GitHub Codespaces
On your local machine with DDEV—recommended
Once your testing environment is established, it’s very quick and easy to test bugs and features.
Tip
You can watch the short tutorial about How to test bugs and features in Mautic on YouTube, which explains the easy way to do it.
Setting up a testing environment on GitHub Codespaces
GitHub Codespaces allows you to spin up a Mautic instance in the cloud, with a pull request—also known as PR—applied. The Mautic instance also has a mail catching tool, Mailpit, and PHPMyAdmin available to view database tables. While some PRs can’t be tested in this way, such as when testing the installation process, the vast majority can.
Setting up a codespace
Go to Mautic GitHub repository.
Open the PR that you need to test.
Click the ‘Code’ button on the right top, next to the PR title.
Click the ‘Codespaces’ tab.
Click the green ‘Create codespace on
BRANCH-NAME’ or ‘+’ sign to create a codespace.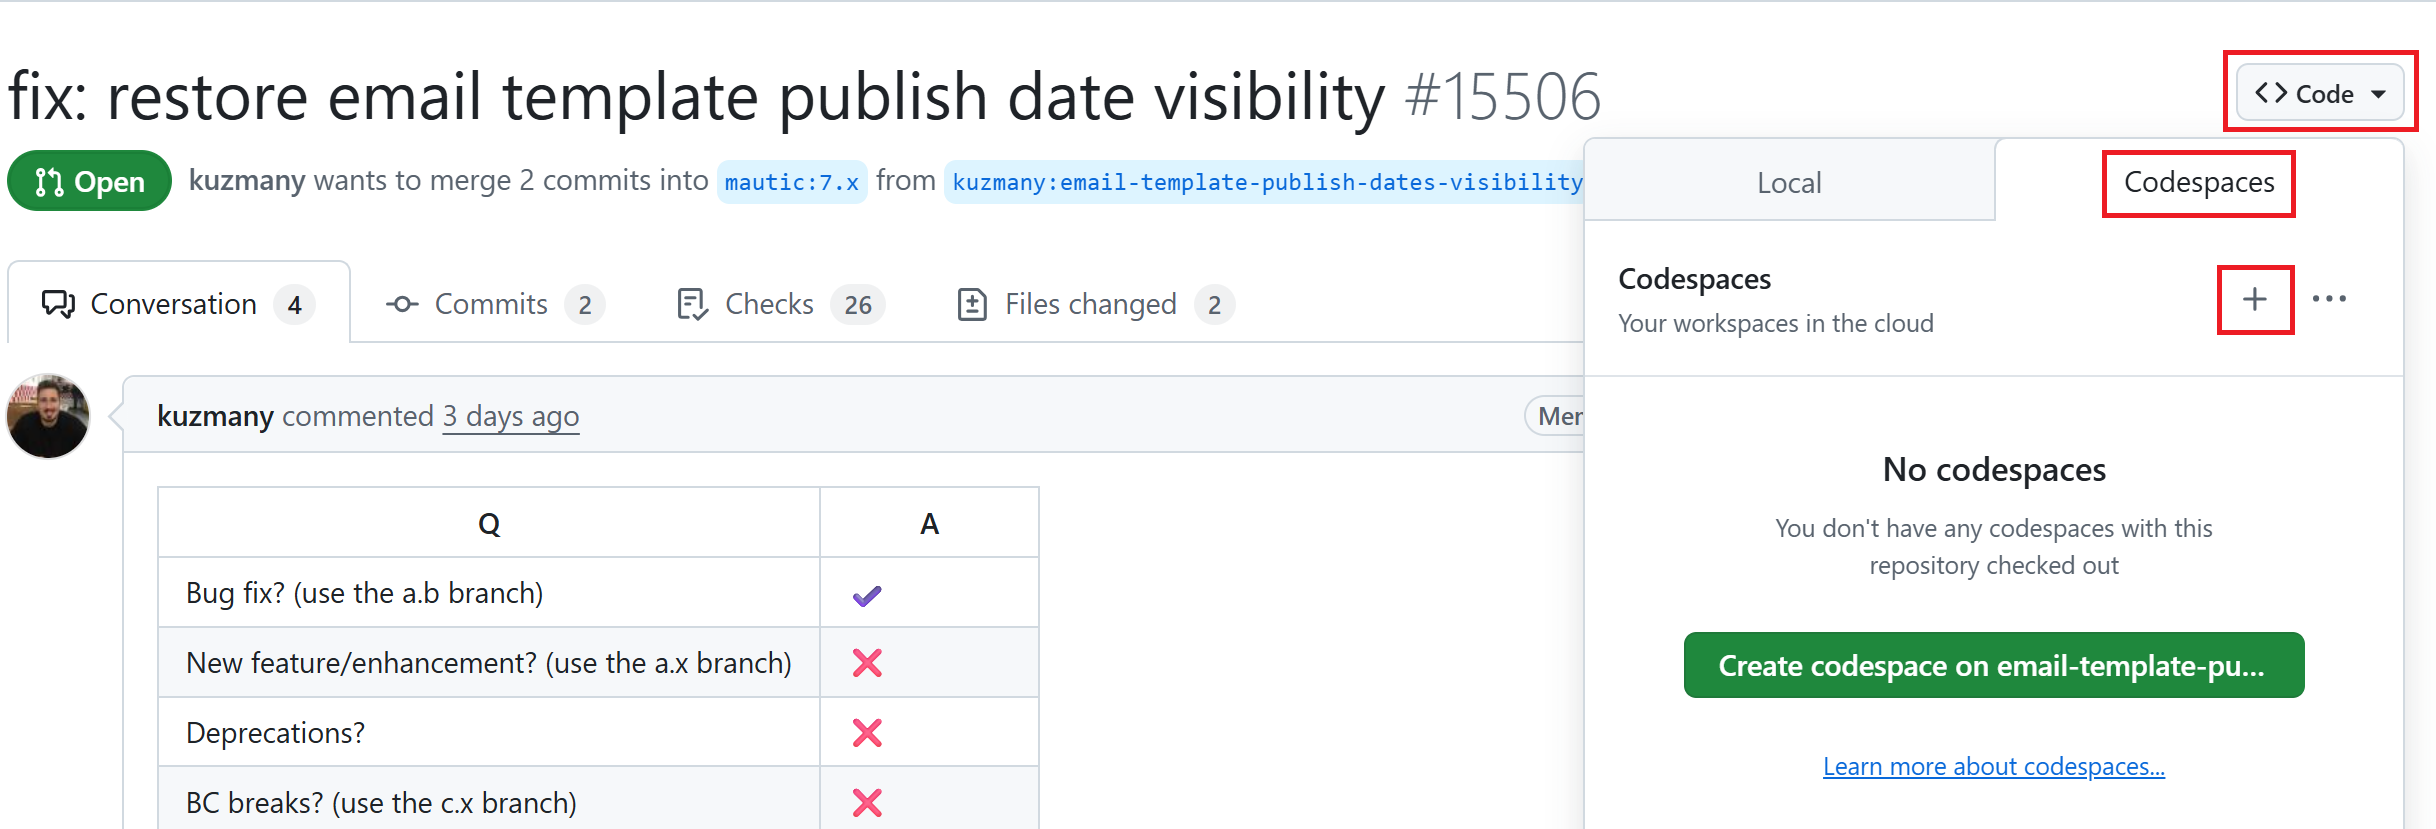
Wait until the codespace finishes building and the
postCreateCommandfinishes its task, as shown in the screenshot below. Please be patient, as it may take some time.
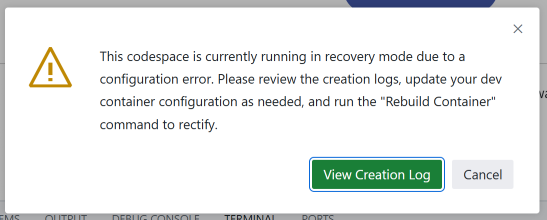
Note: If you get a warning that the codespace is currently running in recovery mode due to a configuration error, as in the following screenshot, follow the instructions in the Rebuild a codespace section.
Once the
postCreateCommandis done, runddev startto install Mautic and its dependencies.Type ‘Y’ and press Enter when you get prompted to
Permission to beam up? [Y/n] (yes):.Please wait until the process is complete, which may take a few minutes to complete.
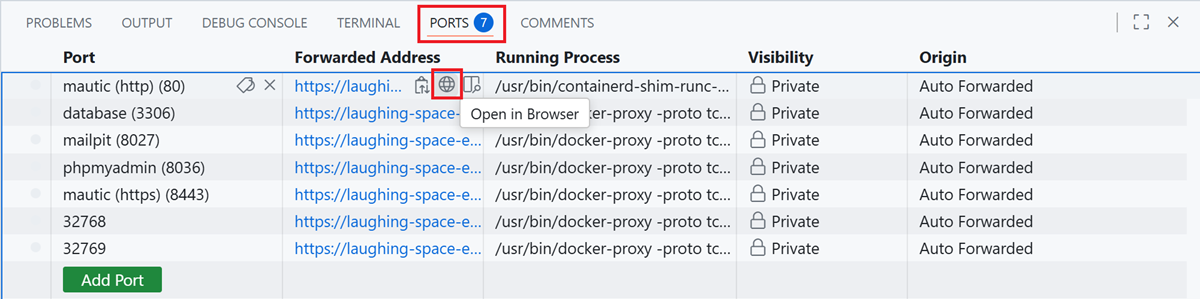
Click the ‘Ports’ tab.
Find the port that you need to open.
Hover over the ‘Forwarded Address’ tab, right next to the port.
Click the globe icon to open the port in the browser.
Log in to Mautic. See the tip below to log in to Mautic.
After you set up the environment, you can follow the test instructions in the PR and report back your findings.
Tip
The default username to login to Mautic is always
admin, and the password isMaut1cR0cks!.If you’re testing an older version of Mautic than
5.1, use the passwordmautic.You can run the
ddev describecommand to see the list and details of available URLs and ports.
Rebuild a codespace
Follow these steps to rebuild your codespace:
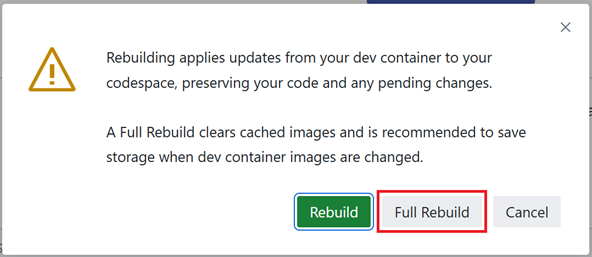
Press
Cmd/Ctrl + Shift + P. It opens a search bar on top.Search for ‘Codespaces: Rebuild Container’, select it, and click it.

Click the ‘Full Rebuild’ button.
Follow the instructions starting from step 6 in the Setting up a codespace section.
Note
Now that you’ve set up the codespace, go to the Testing your first PR section to start testing a PR.
Setting up a local testing environment
Prerequisites
Before starting, you need a few pieces of software on your computer:
A Docker provider *
* Please read the Docker Installation section on the DDEV official website to learn which Docker provider is suitable for your operating system.
Once you have these installed, use a code editor such as Visual Studio Code, which allows you to interact with files, folders, and the command line. There are other editors and Integrated Development Environments (IDEs). So if you already have a preference, by all means, use that.
You also need to register for an account at GitHub if you don’t already have one. It allows you to leave comments when you’ve tested things, and also means you can make fixes yourself in the future.
Forking the repository
Forking the repository is the first step you need to take before proceeding. Forking means making a copy of a repository to your GitHub account.
To fork the repository:
Go to Mautic GitHub repository.
Click the ‘Fork’ button at the top.

Choose your username in the ‘Owner *’ dropdown menu. Don’t select an organization here. Always choose your personal account.
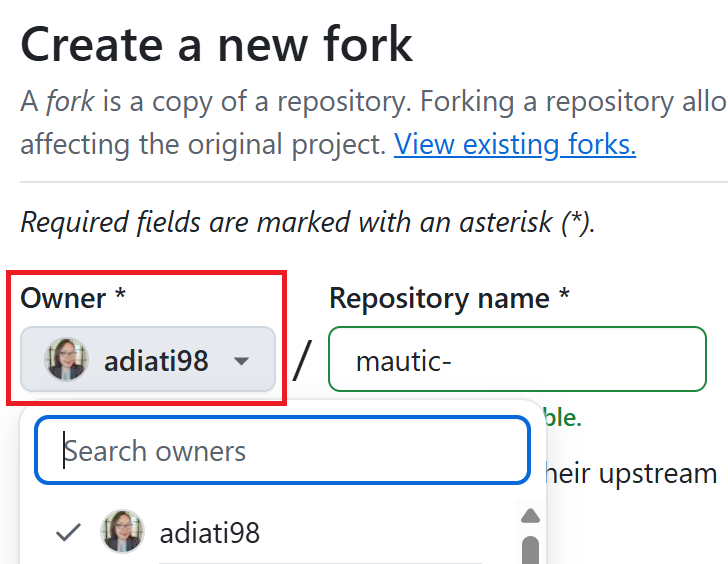
Uncheck the checkbox of ‘Copy the
DEFAULT-BRANCH-NAMEbranch only’ because later on, you want to be able to clone multiple branches.Click the green ‘Create fork’ button at the bottom.

Cloning the repository
After you forked the repository, you need to clone it. Cloning means making a copy of a repository in your local environment. In this case, you want to clone your forked repository.
The Mautic GitHub repository contains multiple branches that represent specific release versions of Mautic. You should clone the branch that you need to test into its own dedicated folder.
For example, when you need to test Mautic versions 6 and 7, clone the branch 6.0 and save it in a folder. Then, clone the branch 7.x and save it in a separate folder. You can name the folder anything you want, but it’s best to reflect the branch name. For example, use names like mautic6, mautic7, and so on.
Follow the steps below to clone your forked repository:
Create a folder in your local computer where you’ll locate all your local working environments. It’s up to you what to name it and where you save it.
Inside the newly created folder, create another folder and name it
mautic.Open your editor, and within the editor, open a terminal window.
In the terminal, move into the directory you just created. Use the following command:
cd YOUR-FOLDER/mautic
If you’re unsure where you are, run the following command to see the list of the directories and files of the current folder that you’re at:
ls
If you need to move up a directory, for example, back to
/YOUR-FOLDER/, you can use the command:cd ..
Run the
git clonecommand specifying the branch you need to test and a folder name to save it, then hit Enter:git clone --branch BRANCH-NAME https://github.com/YOUR-GITHUB-USERNAME/mautic FOLDER-NAME
Here are some examples:
git clone --branch 5.2 https://github.com/YOUR-GITHUB-USERNAME/mautic.git mautic5
git clone --branch 6.0 https://github.com/YOUR-GITHUB-USERNAME/mautic.git mautic6
git clone --branch 7.x https://github.com/YOUR-GITHUB-USERNAME/mautic.git mautic7
Note
DDEV uses the folder name as the project name, so later on, this automatically gives you clean URLs like:
https://mautic5.ddev.sitehttps://mautic6.ddev.sitehttps://mautic7.ddev.site
Setting up a local DDEV instance
Now that you have the repository’s branch that you need to test locally, it’s time to set up a local DDEV instance so you can use PHP, MySQL, and all the other components that Mautic requires to run.
Move into the directory using the command, where ‘X’ is the version of Mautic that you saved in your
mauticfolder:cd mauticX
For example:
cd mautic7
Start the DDEV environment with this command:
ddev startThe first time you run this command, it might take a little while to run through the process.
If prompted to install Mautic, choose ‘Yes’.
This installs all the dependencies that Mautic requires to run.
Live preview the Mautic instance
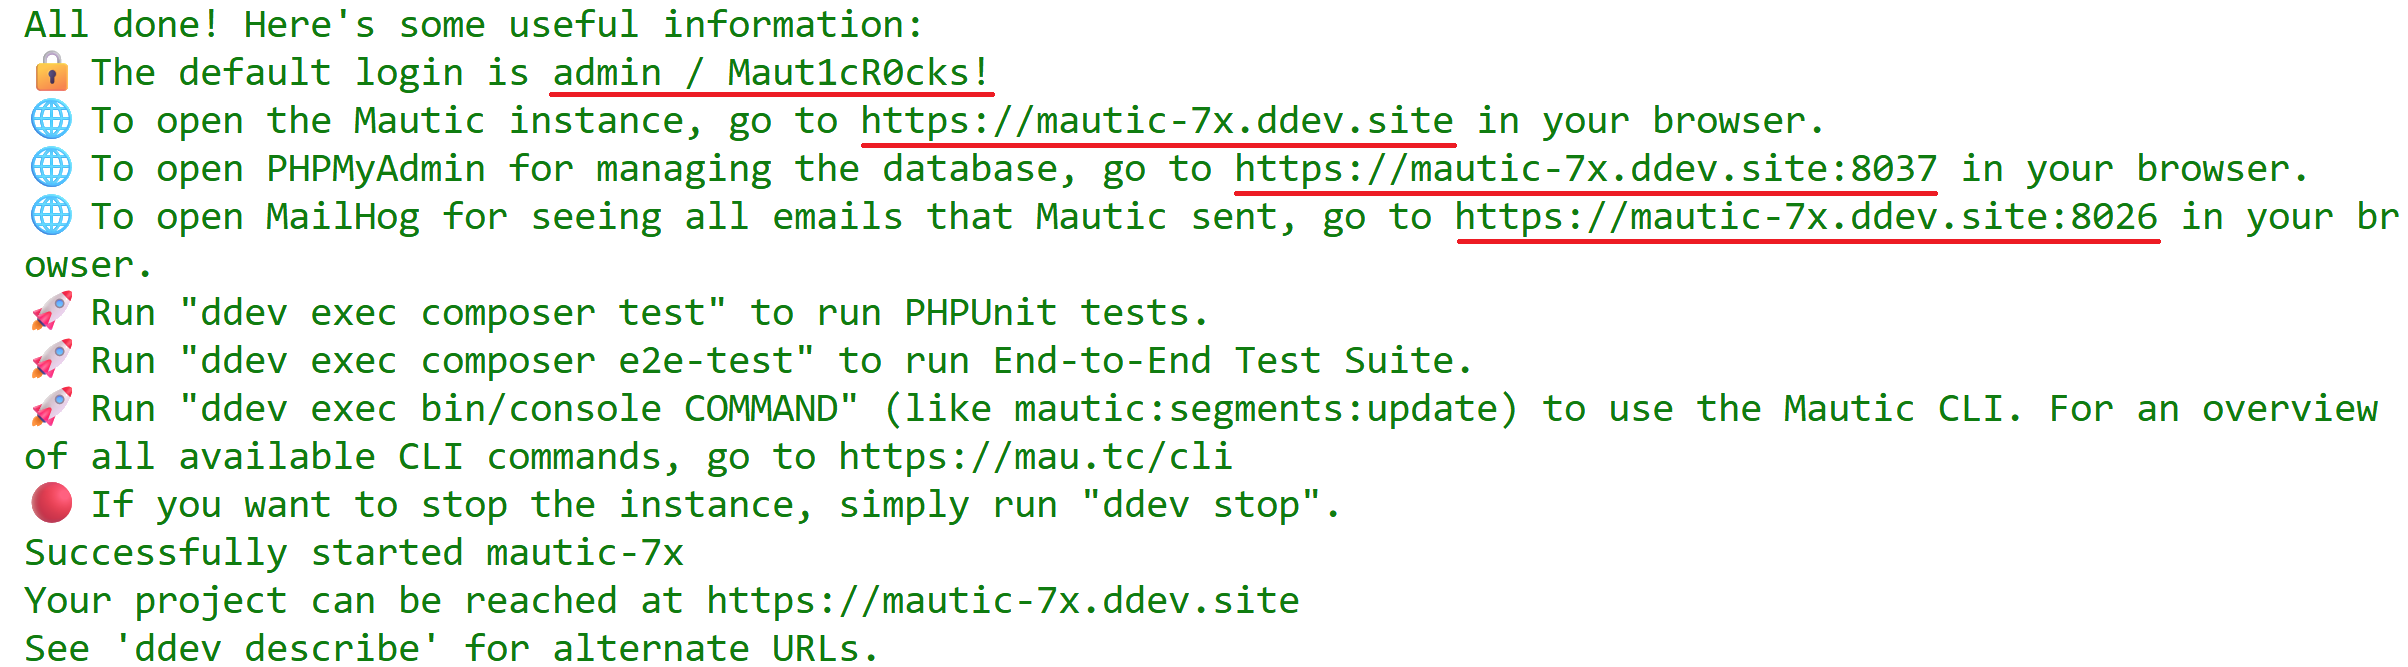
Once the installation process finishes, it displays the URL for the Mautic instance, as well as the URLs for Mailpit and PHPMyAdmin, in case you need to test outgoing emails or database operations. It also provides you with the default credentials to use for the login.
Follow the steps below to open the Mautic instance:
Hover over the link to the URL of the Mautic instance.
Open the link in the browser by pressing
Alt + click.Log in to Mautic. See the tip below to log in to Mautic.
Tip
The default username to login to Mautic is always
admin, and the password isMaut1cR0cks!.If you’re testing an older version of Mautic than
5.1, use the passwordmautic.
Testing your first PR
The first step when testing a bug is to attempt to reproduce the bug and ensure that you are experiencing the same problem that the developer is trying to fix. Please read the Reproducing a bug section for the complete steps.
Generally, instructions are included in the PR description, but you may need to refer to an issue that reports the bug to find instructions for reproducing the problem. If you don’t understand or are unable to reproduce the issue, please leave a comment, and the developer would respond with further instructions.
Once you have confirmed the bug, you can start testing the PR:
Ensure you reproduce the bug using the base branch that the PR was made against. It should target the branch of the Mautic release version that’s reported on the issue. You can see the base branch right under the PR title.

In the terminal, run the GitHub CLI command below:
gh pr checkout NUMBER
Replace
NUMBERwith the ID number of the PR. You can find this next to the PR title.This command pulls down the changes made by the developer and applies them to your local Mautic instance. It also clears your cache automatically.
Now that you have the PR in your environment, the next step is to retest the bug or check out the new feature. Make sure you are thorough in your testing. Really think about every possible thing that might be affected by the changes being made in the PR, and test it in detail.
It would be very helpful if you could write a comment explaining what you have tested.
Reproducing a bug
First, you need to update the base branch in your forked repository:
Go to your forked repository:
https://github.com/YOUR-GITHUB-USERNAME/mautic.Click the branch dropdown menu on the top left.
Select the branch where you need to reproduce the bug from.

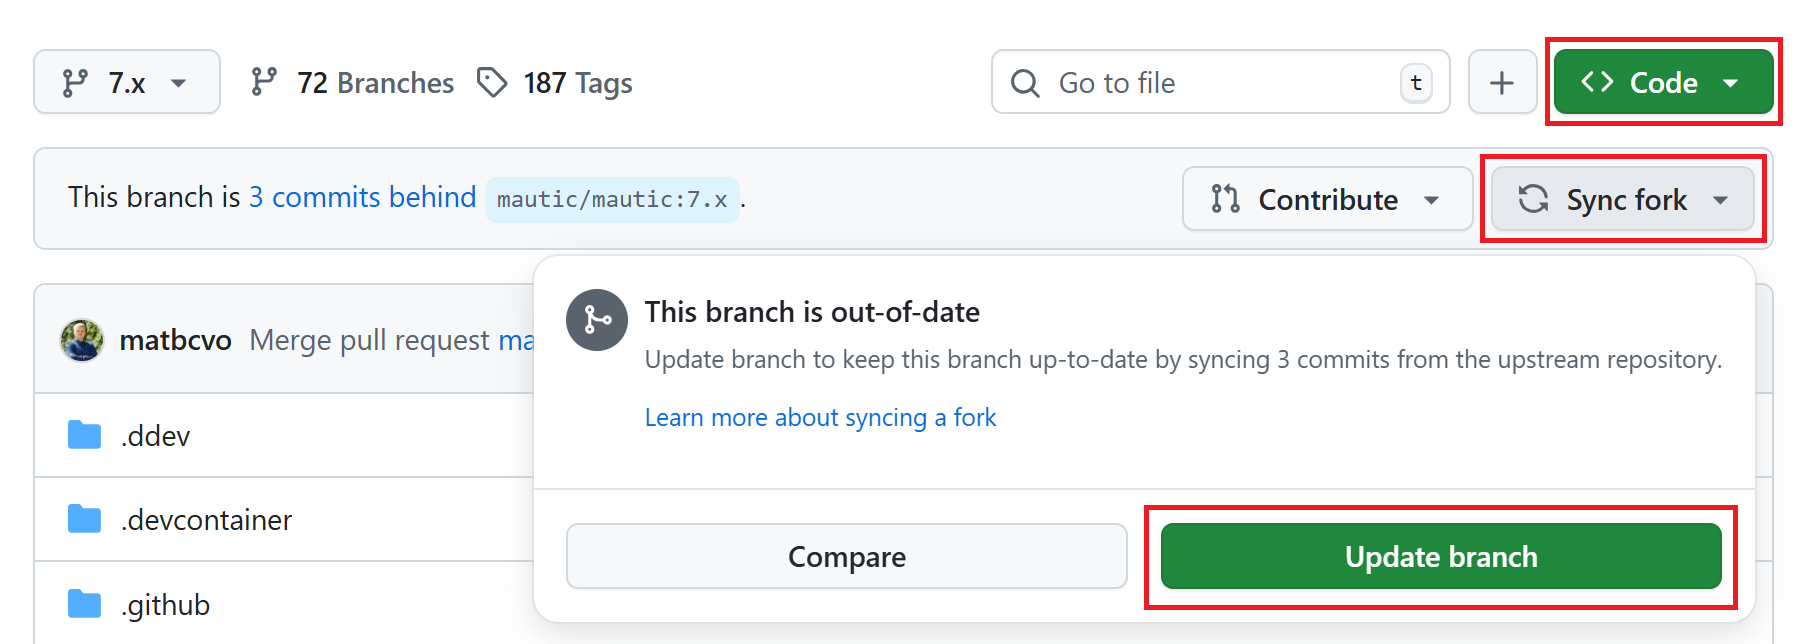
Click the ‘Sync fork’ button on the top right to ensure that the branch in your forked repository is up to date.
If your branch is up to date, it shows “This branch isn’t behind the upstream
mautic/BRANCH-NAME” message.However, if you need to update your branch, click the green ‘Update branch’ button.
Then, follow the instructions below, depending on your testing environment.
GitHub Codespaces
Click the green ‘Code’ button at the top right.
Follow the instructions starting from step 4 in the Setting up a codespace section.
Local environments
Open the branch folder that you need to test in your code editor.
Run
git statusto ensure you’re on the correct branch.If you’re not on the correct branch, run
git switch BRANCH-NAMEto switch the branch.Here are some examples:
git switch 5.2
git switch 6.0
git switch 7.x
Run the following command to fetch new changes from your forked repository:
git pull
Using developer mode
When testing Mautic, it’s important that you’re notified of any errors rather than having them output to the logs. To avoid the need for constantly rebuilding the JavaScript and CSS files when changes are made, developer mode is used in the Mautic Community. This mode is configured in the local environment file.
DDEV has developer mode enabled by default. Read more about Environments on Mautic Developer Documentation.
Testing top tips
Installing sample data
To quickly install sample data, use the command ddev exec bin/console d:f:l which loads the Doctrine fixtures. It gives you a big head start with testing.
Build the segments after install
It’s always worth building the segments once you install the sample data, using the command ddev exec bin/console m:s:r.
Testing with different databases / PHP versions
In DDEV, you can set the database and PHP version in a file located in the .ddev/config.yaml folder.
Set up a GitHub codespace from the PR you are testing and immediately stop the build process as soon as the terminal window is displayed by pressing
Cmd/Ctrl + Con your keyboard.Delete anything that has already been started with the command
ddev delete --omit-snapshot --yes && rm -rf var/cache && rm app/config/local.php.Edit the file in
.ddev/config.yamland change the setting—for instance, change DB from MariaDB 10.3 to MySQL 8. Always remember to save the file.mariadb_version: "" mysql_version: "8.0"
Type
ddev startin the terminal to continue with installation.Run the installer in the UI or on the command line, as preferred. All the credentials for the database are
db.Check that you’re using the right version in the system information within Mautic.
Remember to make sure you are using developer mode. DDEV should start in developer mode by default, with the Symfony toolbar at the bottom of the page.
If you make a mistake, open your GitHub Codespaces dashboard, delete the codespace, and start again.
Resetting your local testing environment
To quickly reset your local testing environment by deleting the DDEV containers without a database snapshot, removing the cache directory, and removing the local.php file, you can run this command:
ddev delete --omit-snapshot --yes && rm -rf var/cache && rm app/config/local.php
Leaving a PR review
Within GitHub, there is a built-in system that allows users to leave reviews:
Click the ‘Files changed’ tab, under the PR title.
Click the green ‘Review changes’ button at the top right, which allows you to start a review.
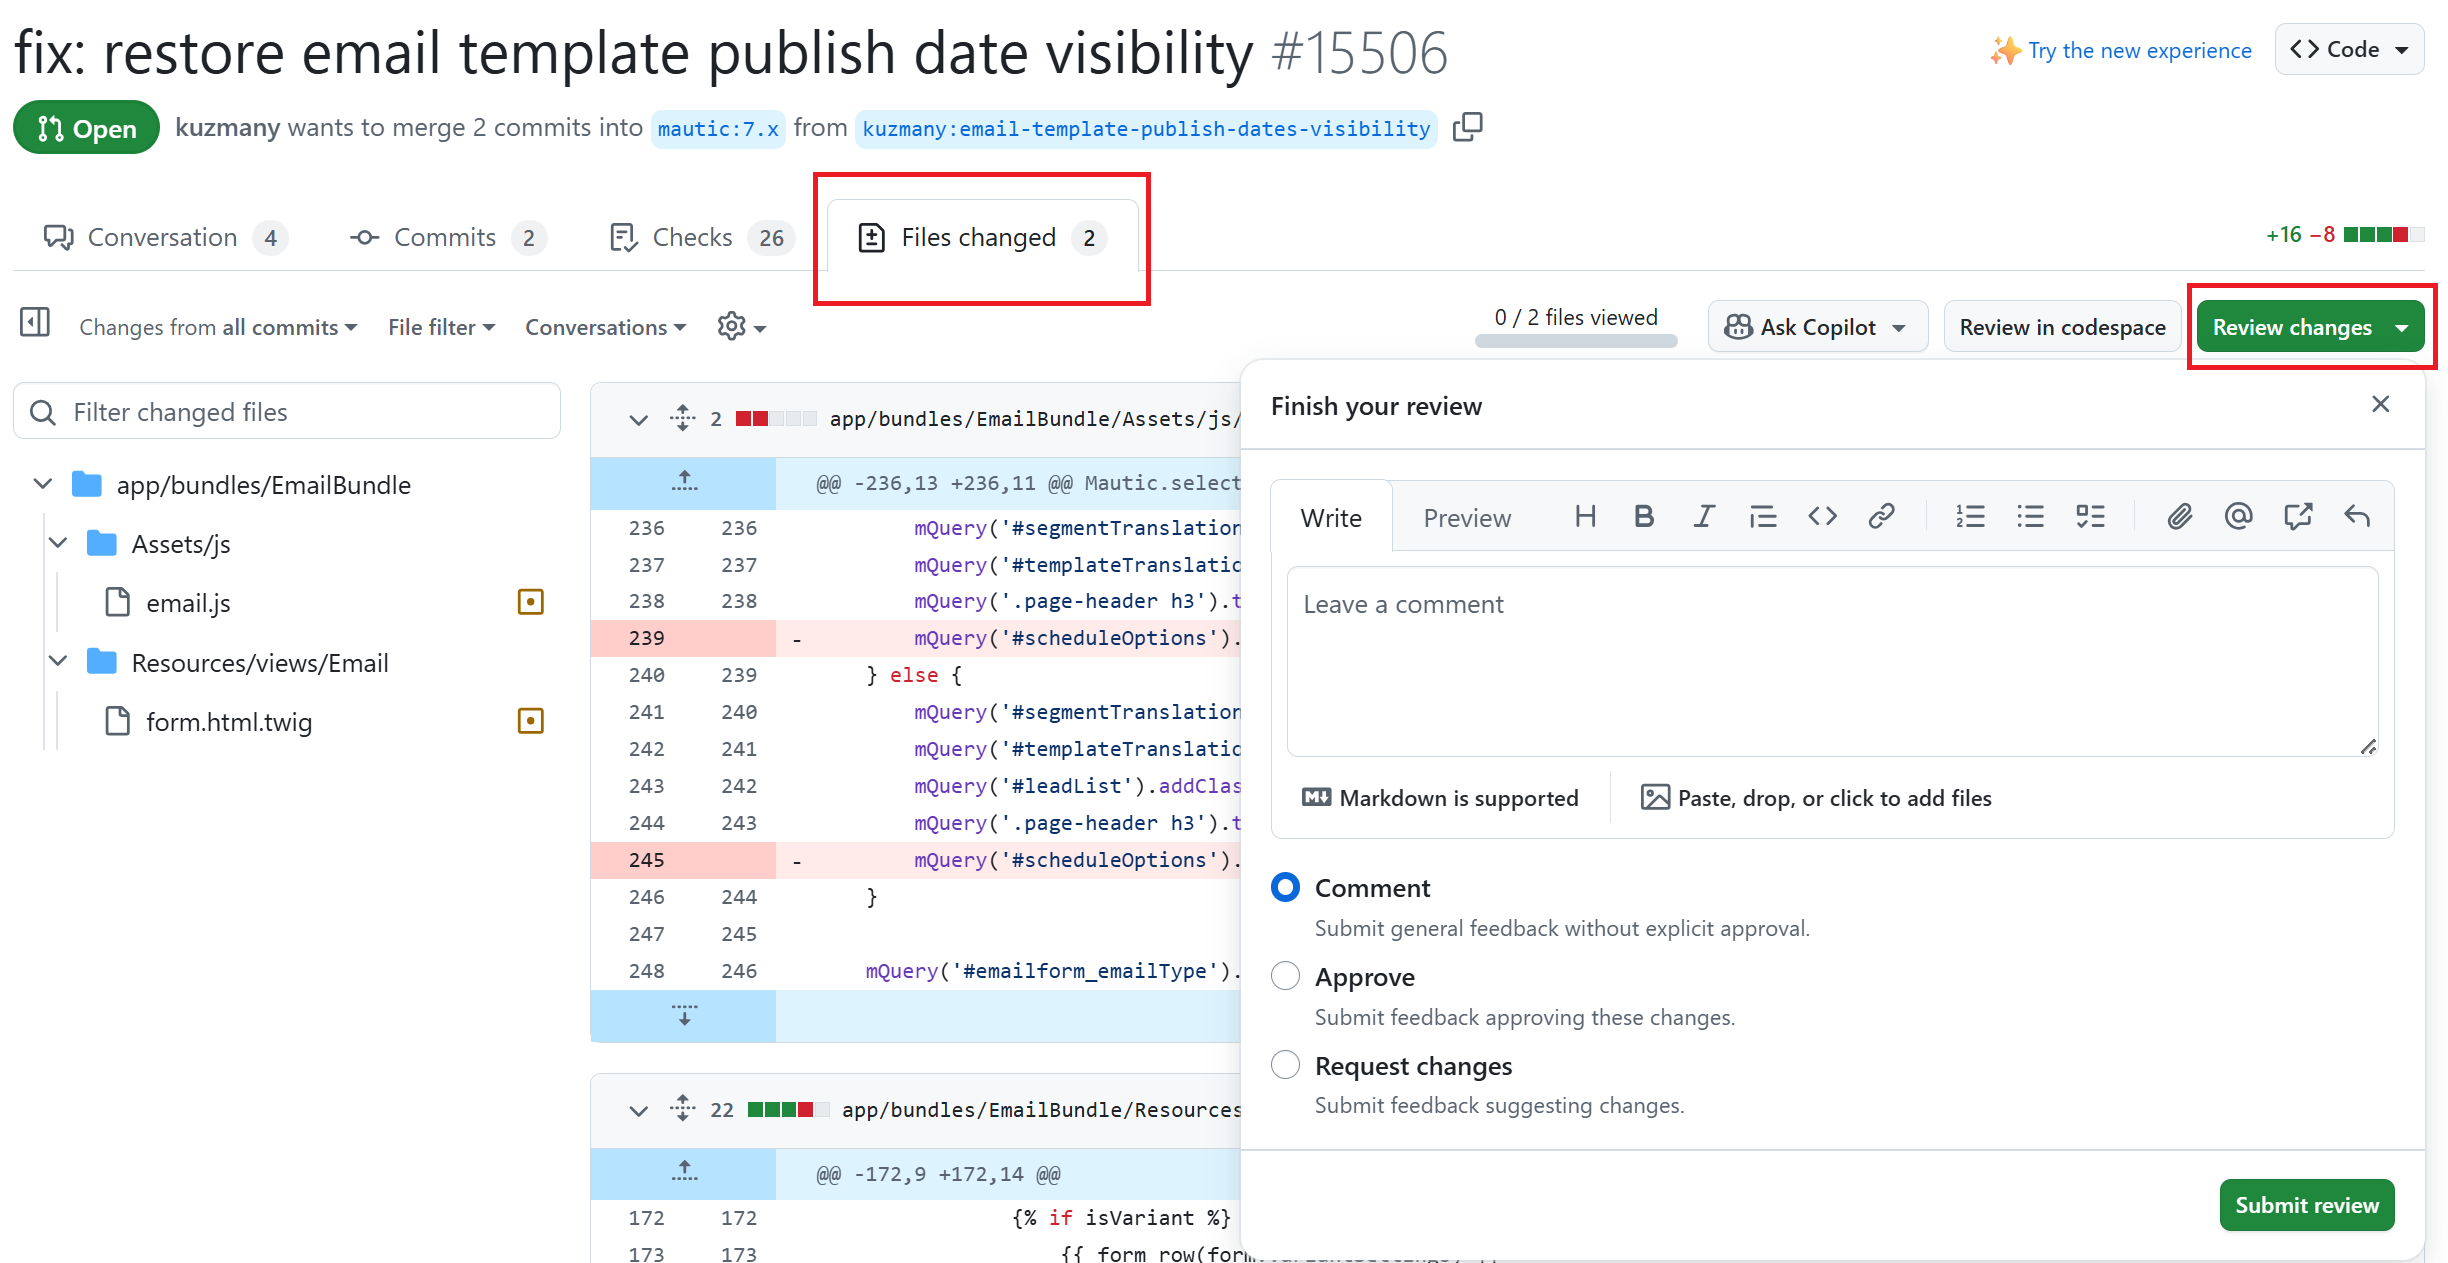
From this point, you can share what you have found when testing the PR. You can select whether you:
approve the PR,
need to ask for some changes, for instance, if you weren’t able to get the results that you expected,
leave a comment if you’re not sure either way,
want to leave some feedback.
Unloading the PR
Once you have finished testing the PR, it’s good practice to revert to the original state. To do this, use the command:
git checkout BASE-BRANCH-NAME
The BASE-BRANCH-NAME is the branch that you want to return to. This command checks you out from the PR to the base branch, where you started from.
For example:
git checkout 5.2
git checkout 6.0
git checkout 7.x
Now you’re ready to go and find another PR to test. Have a little celebration because you helped make Mautic even more awesome. Thank you for your contribution.