Assemblies
This documentation explores assemblies, what they are, why they’re important, why you might want to get involved with using them, and what you can do.
Tip
You can watch the short tutorial Mautic Community Portal - Assemblies on YouTube, if you prefer a video format.
Getting started with assemblies
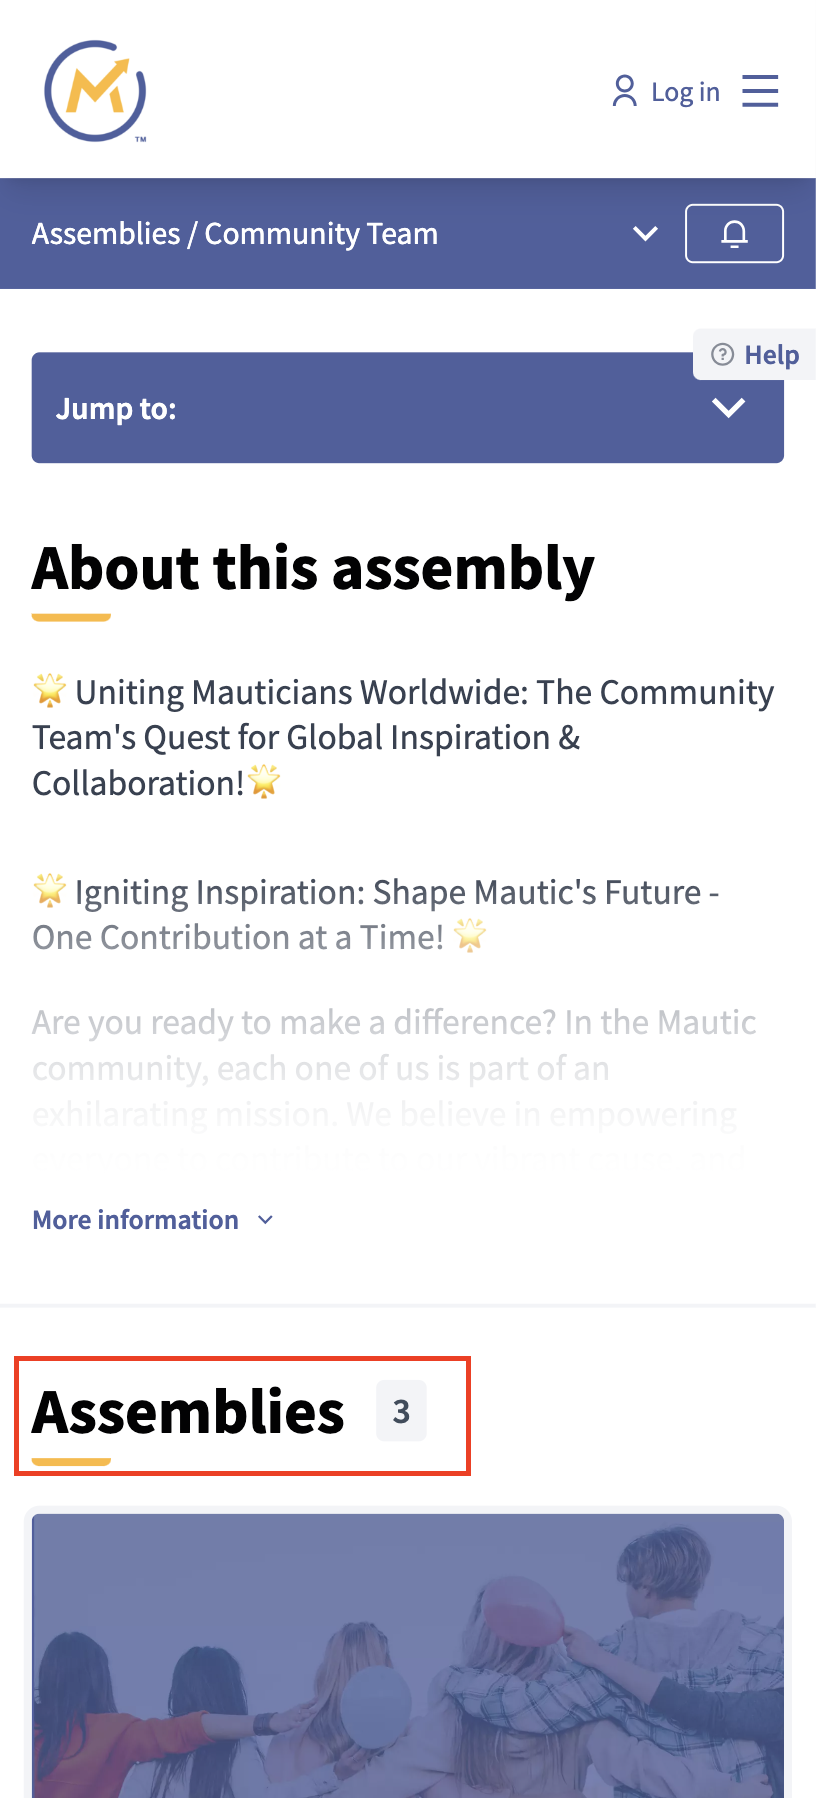
You can access assemblies via the link on the main menu. When you visit this page, you’ll notice some highlighted assemblies, followed by the full list of top level assemblies.
An assembly is a grouping of people who come together to make decisions about specific things or to run different parts of the community.
There are different reasons for having assemblies. Some of them relate to decision-making and governance, such as the Council and the General Assembly, while others are for Teams, Meetup Groups, and Working Groups.
An assembly can also contain assemblies within it. For example, the MautiCon Working Group is part of the Community Team because that’s the team in which it belongs. The card shows a stacked appearance and lists the number of assemblies within it, as seen in the Community Team here.
Exploring assemblies
When you click through to an assembly, you are presented with the overview page.
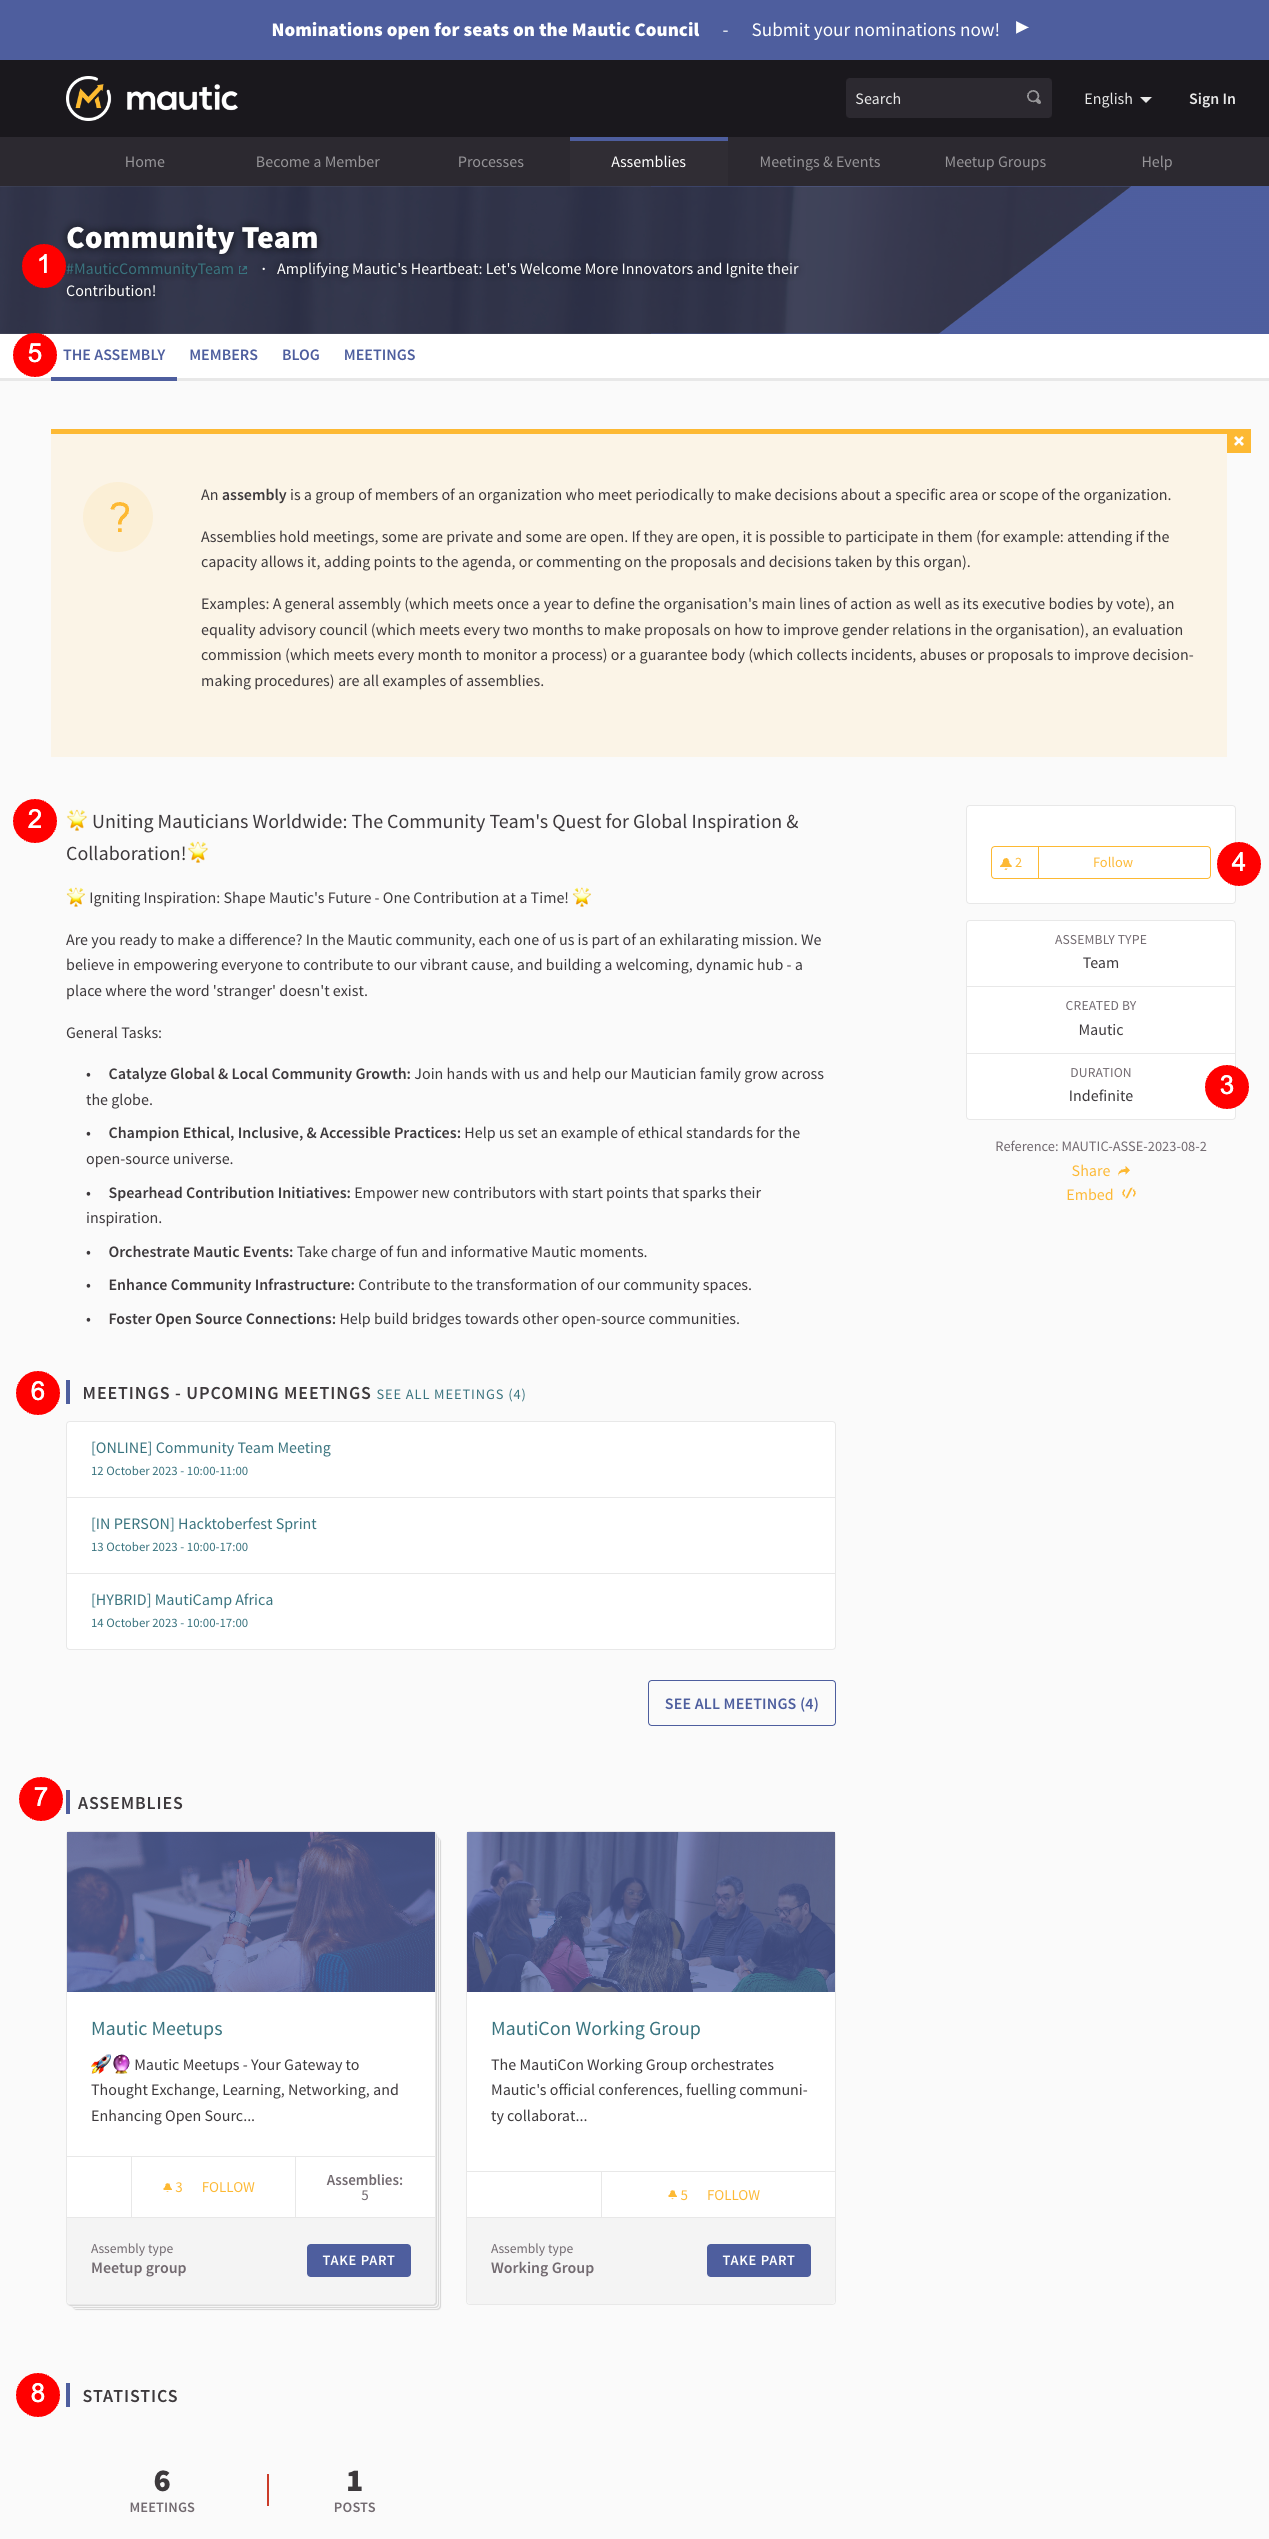
Where it has been set, there’s a hashtag which relates to the specific assembly.
The main page for an assembly provides an overview, which is basically the charter for that organized group - what they do and why they exist.
If this assembly has a finite time for existence - for instance, if it exists to support a specific event - this information appears in the ‘Duration’ on the right-hand side of the page.
The ‘Follow’ button is common across the whole of the community portal, allowing you to get updates from assemblies, groups, processes and so forth by clicking the button. Think of it as similar to following on social media pages
Each assembly has a sub-menu with different components based on the assembly’s needs.
Any upcoming scheduled meetings appear in a list, and where an option exists, you can join the meeting by clicking through. After meetings, you can view minutes and notes.
If an assembly has sub-assemblies, they appear in this section. Remember, assemblies and sub-assemblies can contain other assemblies.
At the bottom of the page, you’ll find statistics about the assembly.
Members
An assembly has formal roles, including:
Lead
Assistant lead
Contributor
Custom defined roles
When you click the members item in the assembly menu, it lists the formal members.

If you want to stay informed about an assembly, the best thing to do is to follow that assembly to get updates. When you start practically contributing to an assembly in some way, the team designates you as a contributor or the relevant formal role for the assembly.
Components
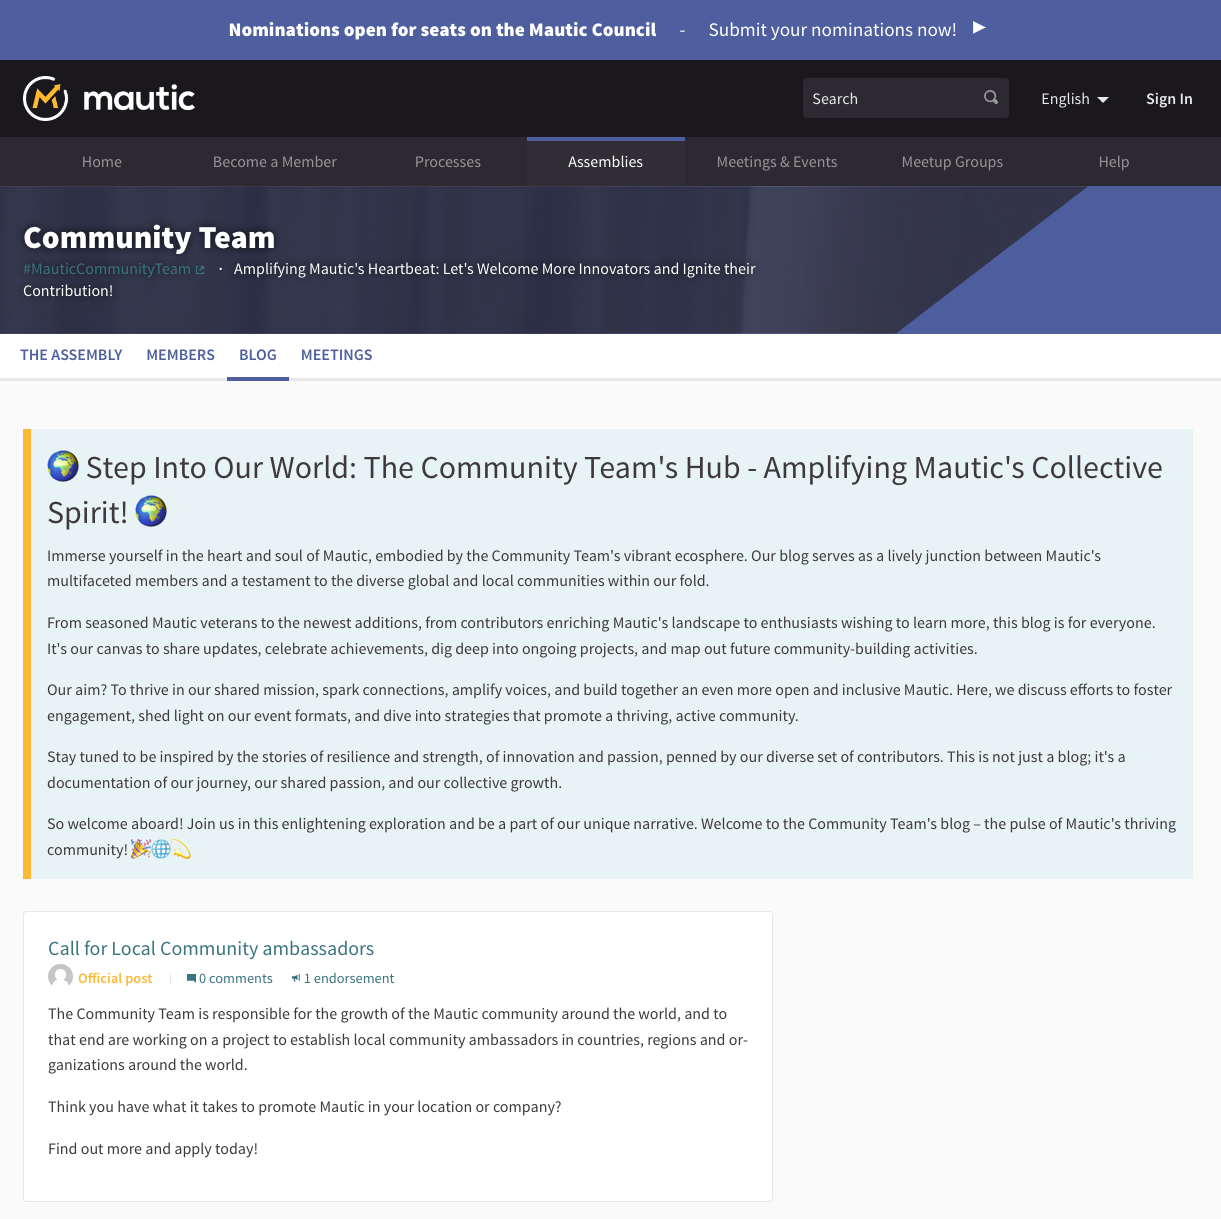
Blog
In the Community Team, a blog is available. Anything across the whole of the community portal can have a blog and they all get output into the activity feed, so it’s a great way of keeping people apprised of what your team is working on and what your project is doing.
In this case, an official post from the team invites people interested in promoting Mautic in their local regions to become ambassadors and express their interest.
Meetings
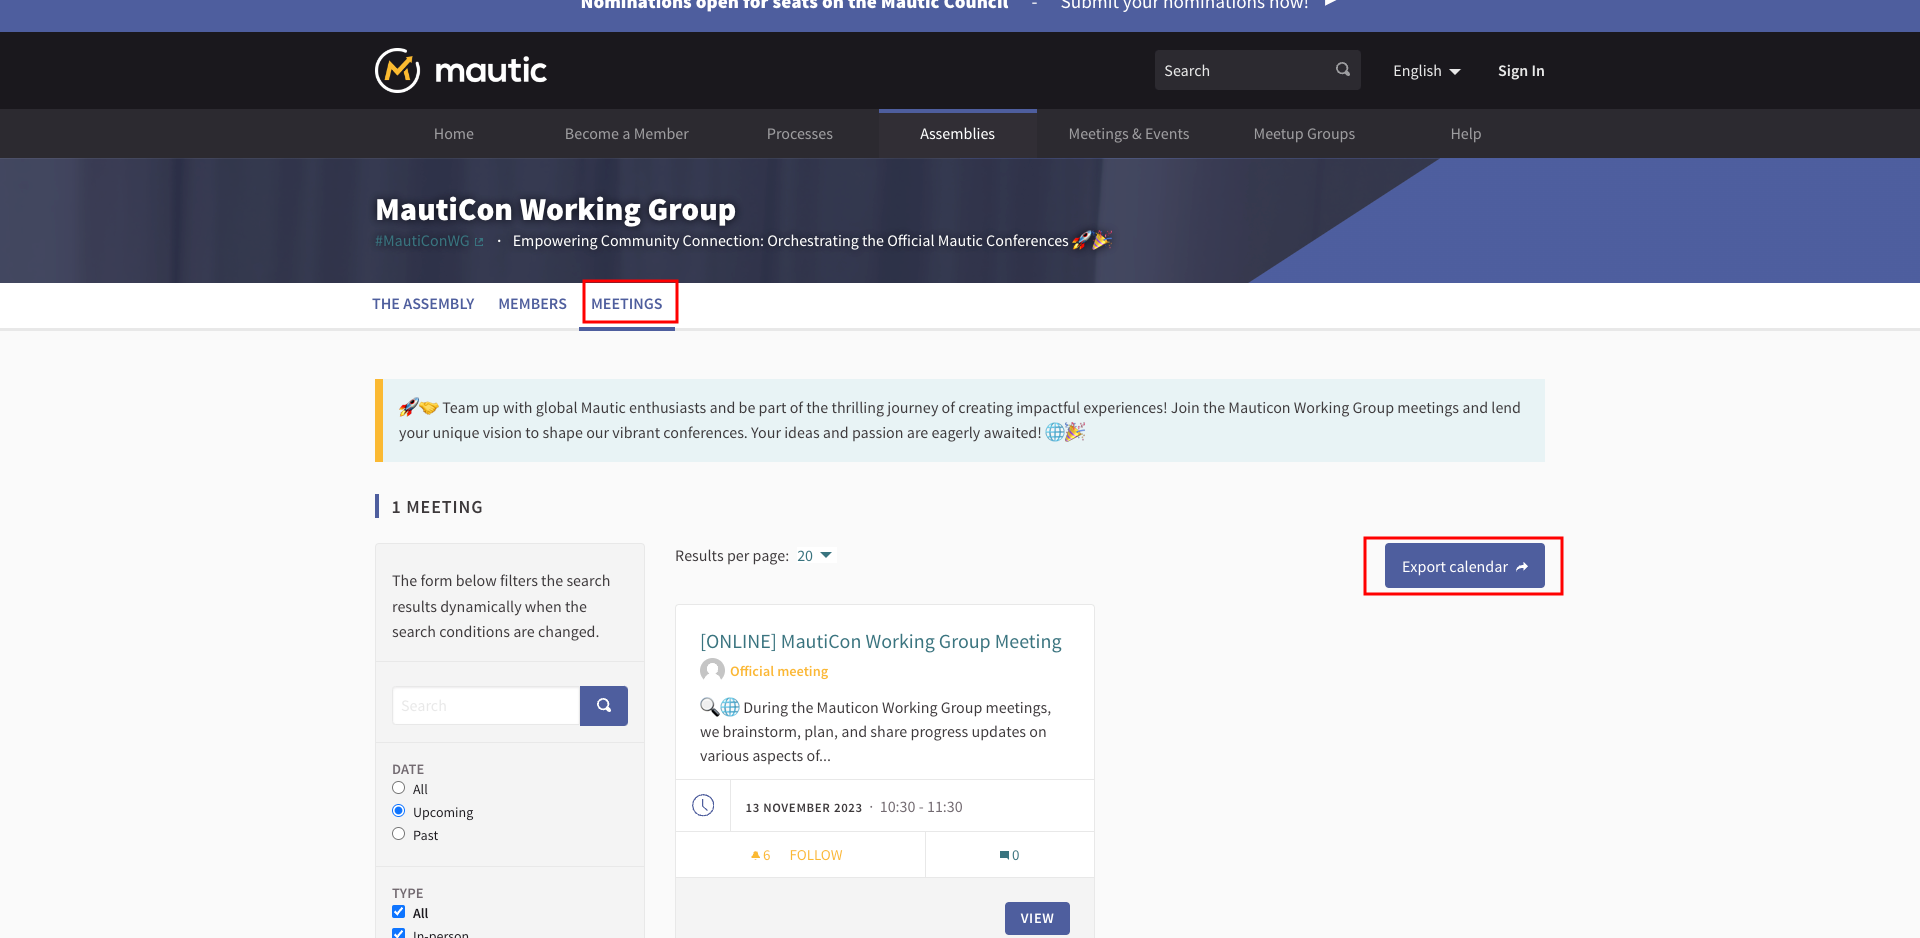
Another popular component used in the portal is meetings. Meetings can be online, hybrid, or in person, and there is an option to filter using select boxes and a search box to show all meetings, upcoming meetings, past meetings, and also to filter by type.
There is an option to export the calendar, which is great if you want to ensure that the meetings for a particular assembly are in your personal calendar. This creates a URL which you can subscribe to in your calendar of choice, so it’s updated automatically.
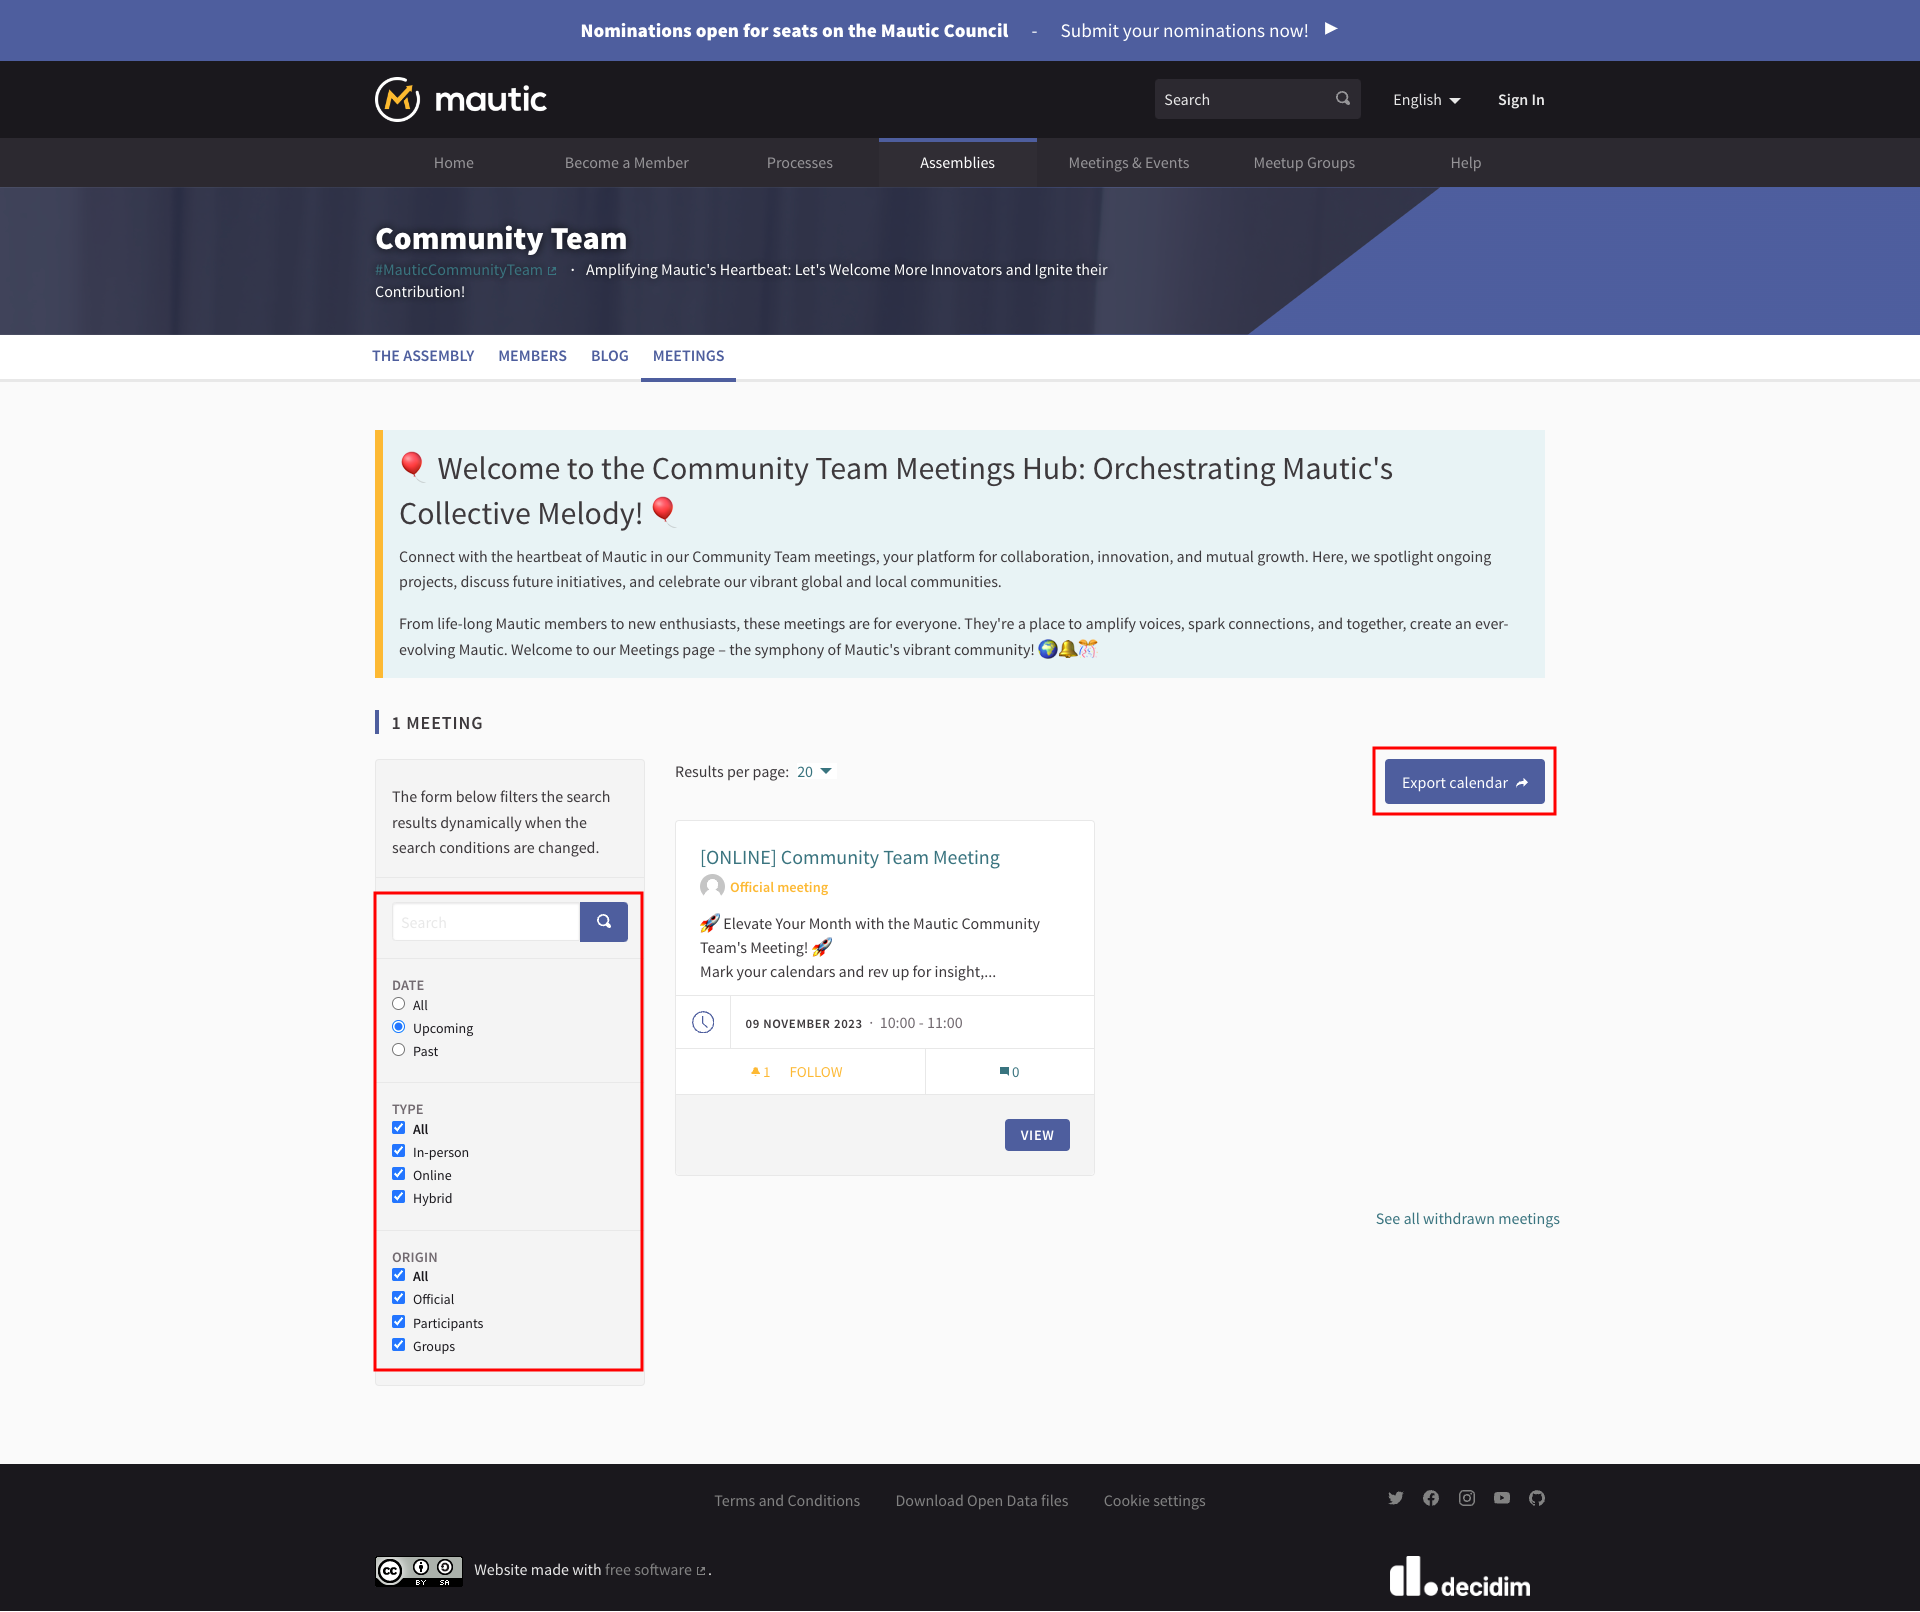
Click ‘Meeting’ to learn more about what’s being discussed.
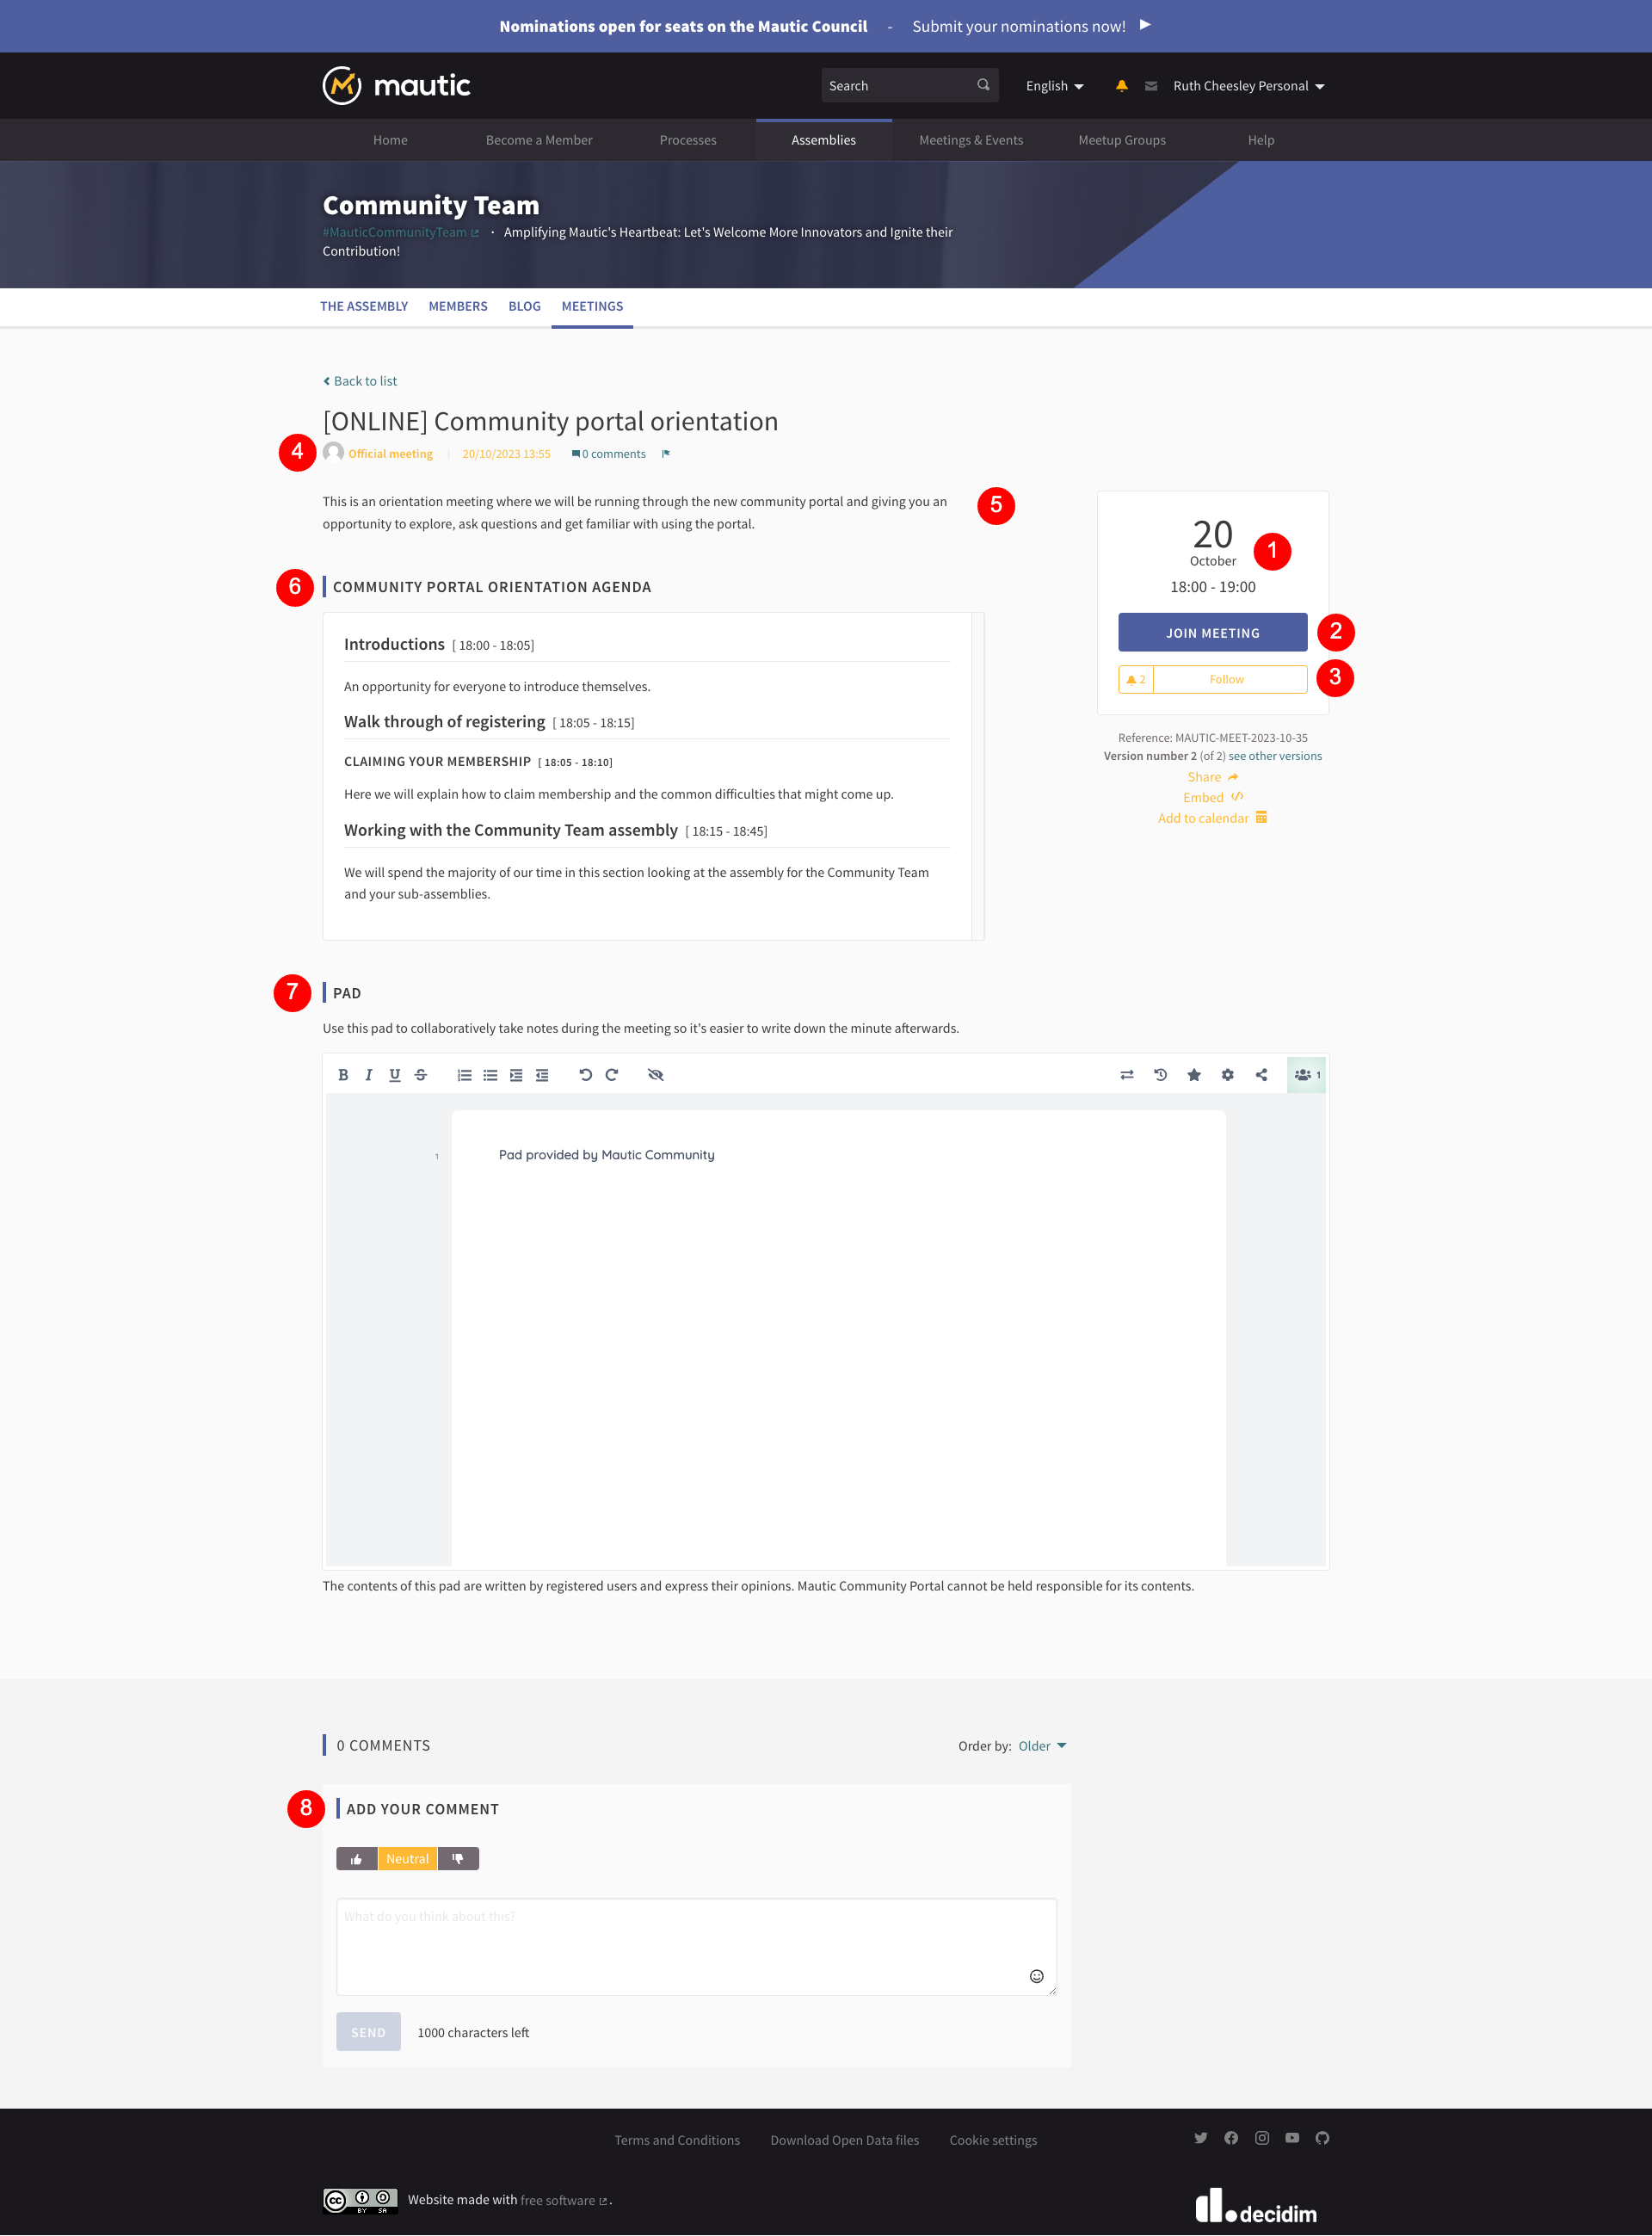
On the right-hand side, you’ll see the date and time for the meeting.
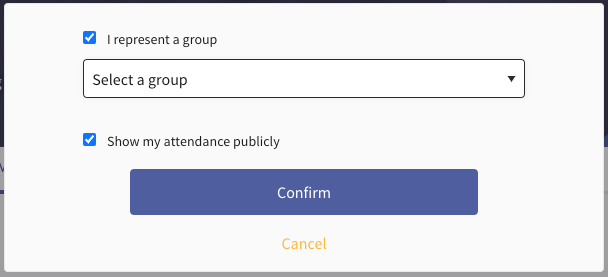
There is a button to join the meeting, which allows you to decide whether you want your participation to be shown publicly or not, and also whether you are representing a group or yourself. Sometimes a meeting uses an external ticketing system, in which case ‘Join meeting’ takes you to that system to complete the form. After registering, you gain access to the link for the online or hybrid meeting.
You can decide to follow the meeting if you want to get updates.
In some assemblies, participants can create meetings as well as the group members. The difference is when a group member creates a meeting, it appears as an official meeting.
A description of the meeting gives you an overview of what’s discussed.
A formal agenda outlines what’s discussed and the rough timings for each section.
An Etherpad which allows you to take notes collaboratively during the meeting. The pad becomes editable within 24 hours of the meeting start time and remains available and editable for 72 hours after. From that point, it becomes read only. This allows people to participate asynchronously if they want to. It’s required to log into the portal to edit the Etherpad.
You can leave comments on a meeting and choose to show positive support, stay neutral, or downvote, along with your comment if you wish. There is a maximum of 1,000 characters per comment.
Subscribing to the calendar
To subscribe to an Assembly’s calendar, click the ‘Meetings’ link in the Assembly menu, then click ‘Export Calendar’. This provides a link for you to add the Assembly calendar in your tool of choice.
To subscribe to all events site-wide, follow the same process but use the ‘Meetings & Events’ menu item on the main menu.
Debates
In the new features process, the component for debates is included. Any of the assemblies or processes can have the debates component available.
If you have a question and you want the community to be able to give you feedback or discussions, this is a great way to do it within the community portal.
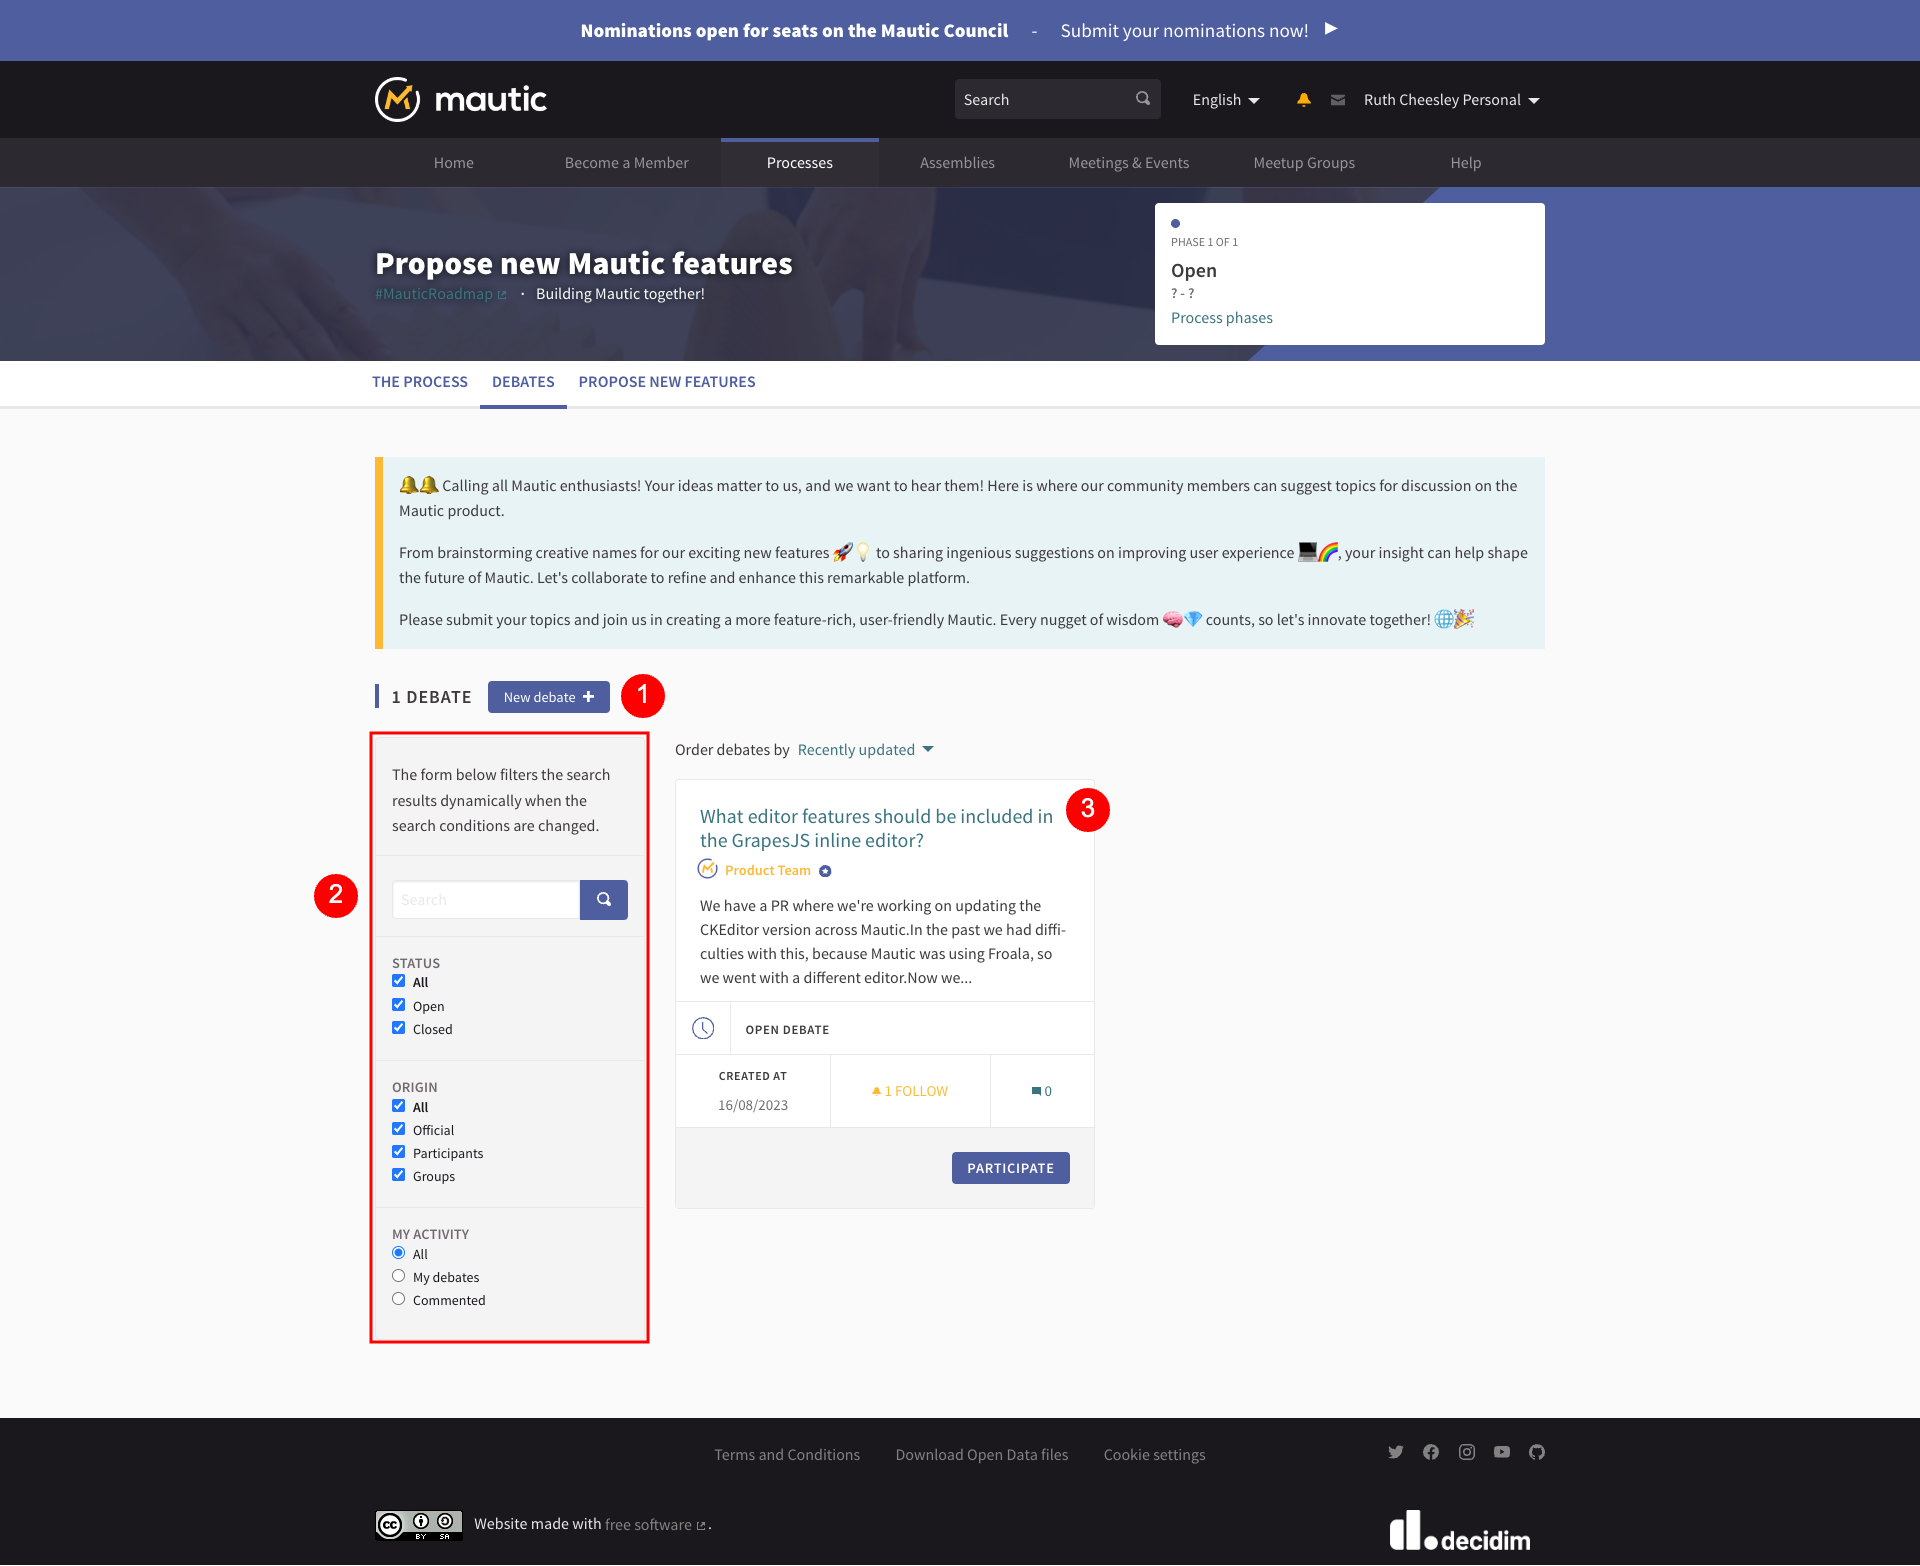
Button to create a new debate.
Search and filter options to look through all debates.
Individual debates.
In this case, the team was working on CKEditor and a question arose about what should be changeable in the WYSIWYG editor when using the GrapesJS Builder. Since many things can change directly in the GrapesJS Builder, the question is how much control you should give to the WYSIWYG editor. This presents an opportunity for discussion and debate.

Button to endorse the debate as yourself or as a group or team.
Button to follow the debate and get notifications about any changes.
A list of individuals and teams or groups who have endorsed the debate.
An opportunity to give positive, neutral, or downvote support and leave a comment with up to 1,000 characters.
Debates could be time limited, or they could close them when the discussion gets to a point where participants make a decision, and then, if appropriate, a related proposal can follow.
Creating an assembly
An assembly is a grouping of people who come together to make decisions about specific things or to run different parts of the community.
There are different reasons for having assemblies. Some of them are relating to decision-making and governance - such as the Council and the General Assembly - but there are also assemblies for Teams, Meetup Groups and Working Groups as well.
An assembly can also have assemblies nested within it - for example, the MautiCon Working Group sits within the Community Team because that’s the team in which it belongs.
Note
The main difference between participatory processes and assemblies is that assemblies don’t have phases, meaning that they don’t have timelines.
How to create a new assembly
The first step before you create an assembly is to decide what the parent assembly should be.
The following are existing top-level assemblies:
Community Team
Education Team
Legal and Finance Team
Marketing Team
Product Team
Council
General Assembly
Think carefully before you create a new top-level assembly. Usually, it should nest within one which already exists. Remember that you can create assemblies within assemblies at any level of nesting. For example:
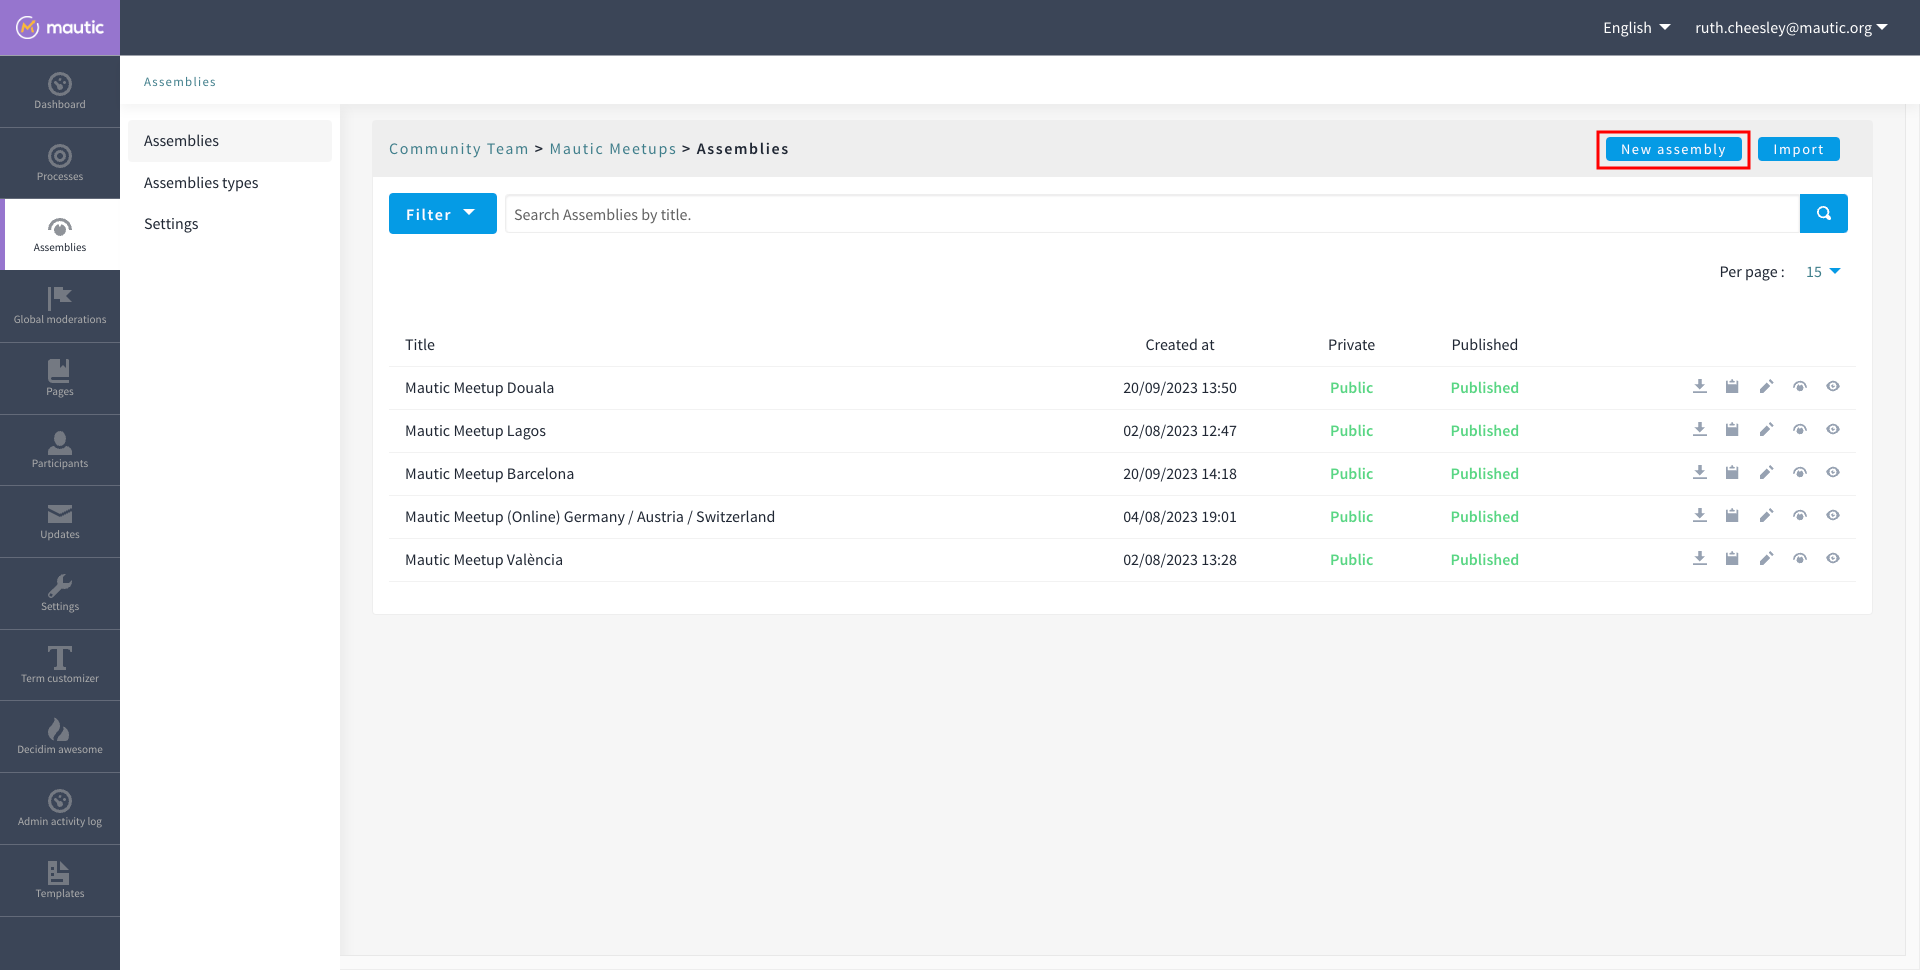
Community Team > Mautic Meetups > Mautic Meetup city
Once you have decided where the new assembly should sit, follow this process to create the assembly:
Log in as an administrator at administrator panel.
Browse to the ‘Assemblies’ section in the administrators portal.
Find the assembly which you want as your parent assembly - note that this icon is black if there are sub-assemblies within the assembly, while clicking it reveals the list of sub-assemblies.
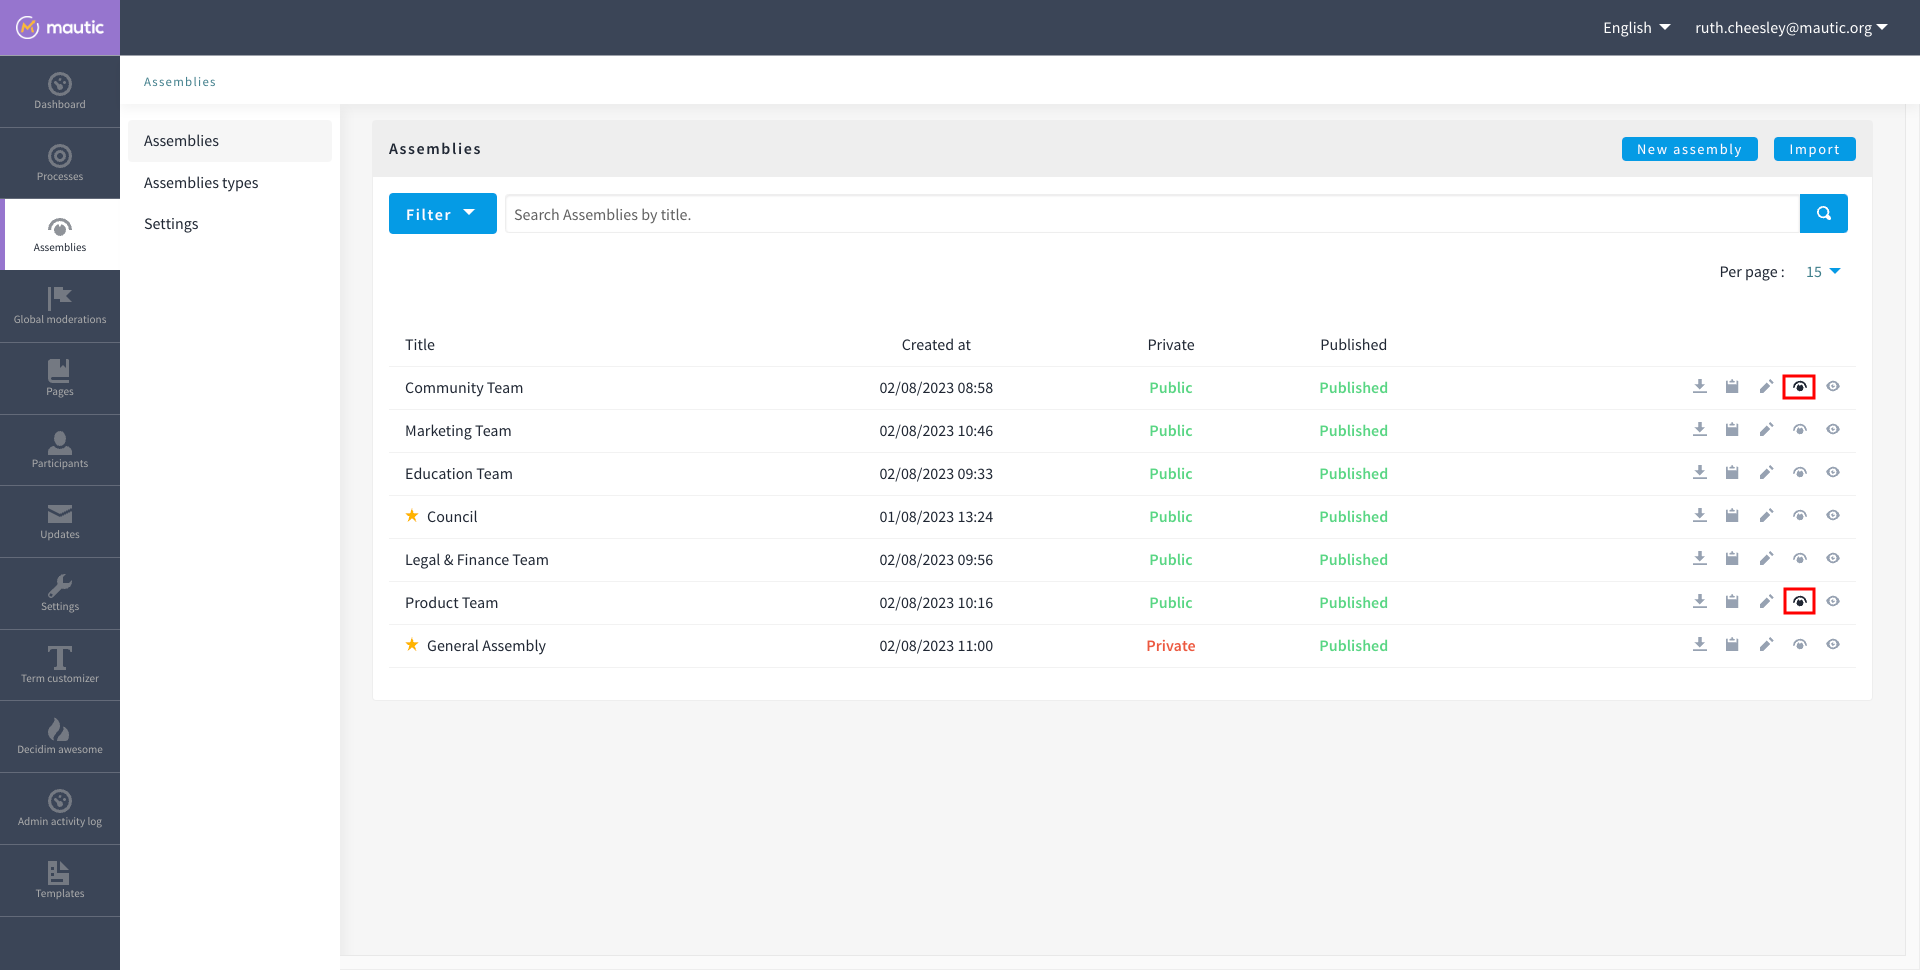
Click on the assemblies icon as before, representing the parent assembly.
Click on ‘New assembly’. In the earlier example, when creating a new assembly within the Mautic Meetups assembly, the parent assembly - Mautic Meetups - is within the Community Team assembly. So first, navigate to the sub-assemblies of the Community Team, then the sub-assemblies of the Mautic Meetup assembly, then click ‘New assembly’.
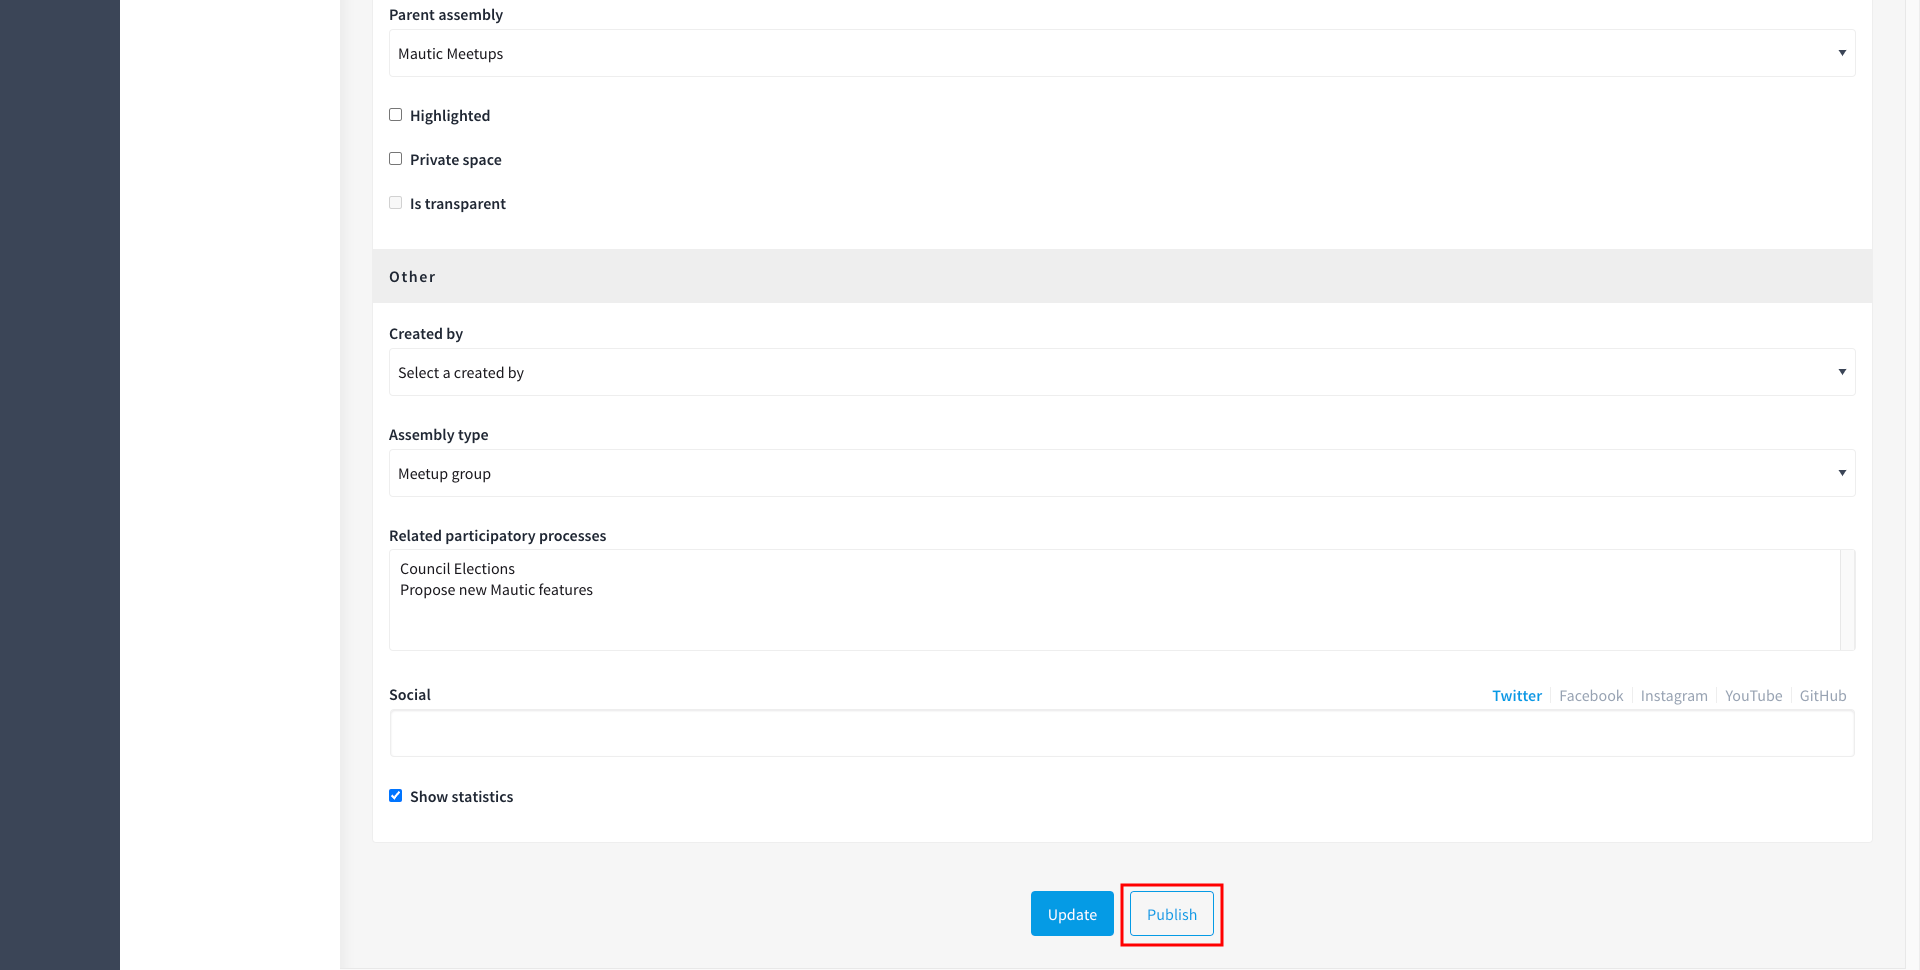
Complete the form
Check the Decidim documentation for an explanation of the fields.
Please follow existing naming conventions when it comes to the URL slug and hashtag.
Please use this template to create the image for the assembly on Canva.
Please select the scope that relates to the top-level assembly for your assembly. For instace, for Mautic Meetup groups, this would be Community Team. This helps with searching and filtering.
Please don’t highlight the assembly unless agreed with the Community Portal working group.
If your assembly needs to be invitations only, as far as who can engage in it, you should set it to private. This means, you have to maintain a list of ‘private participants’ who can engage in the assembly. This is quite an overhead, and individuals may also need adding as a member of the group as well to engage in activities. So, only use this where absolutely essential. As an example, the General Assembly uses this. If required, it’s highly recommended that you also set the assembly to transparent so that the community can see what happens in the space, even if they can’t engage. Private participants receive an invitation to join the assembly, which they must accept. Ensure you use the same email address they use on the portal, otherwise duplicate accounts can arise.
Ensure you select the assembly type from the dropdown options.
Once saved successfully, go back to the list. You’ll notice it’s showing as unpublished.
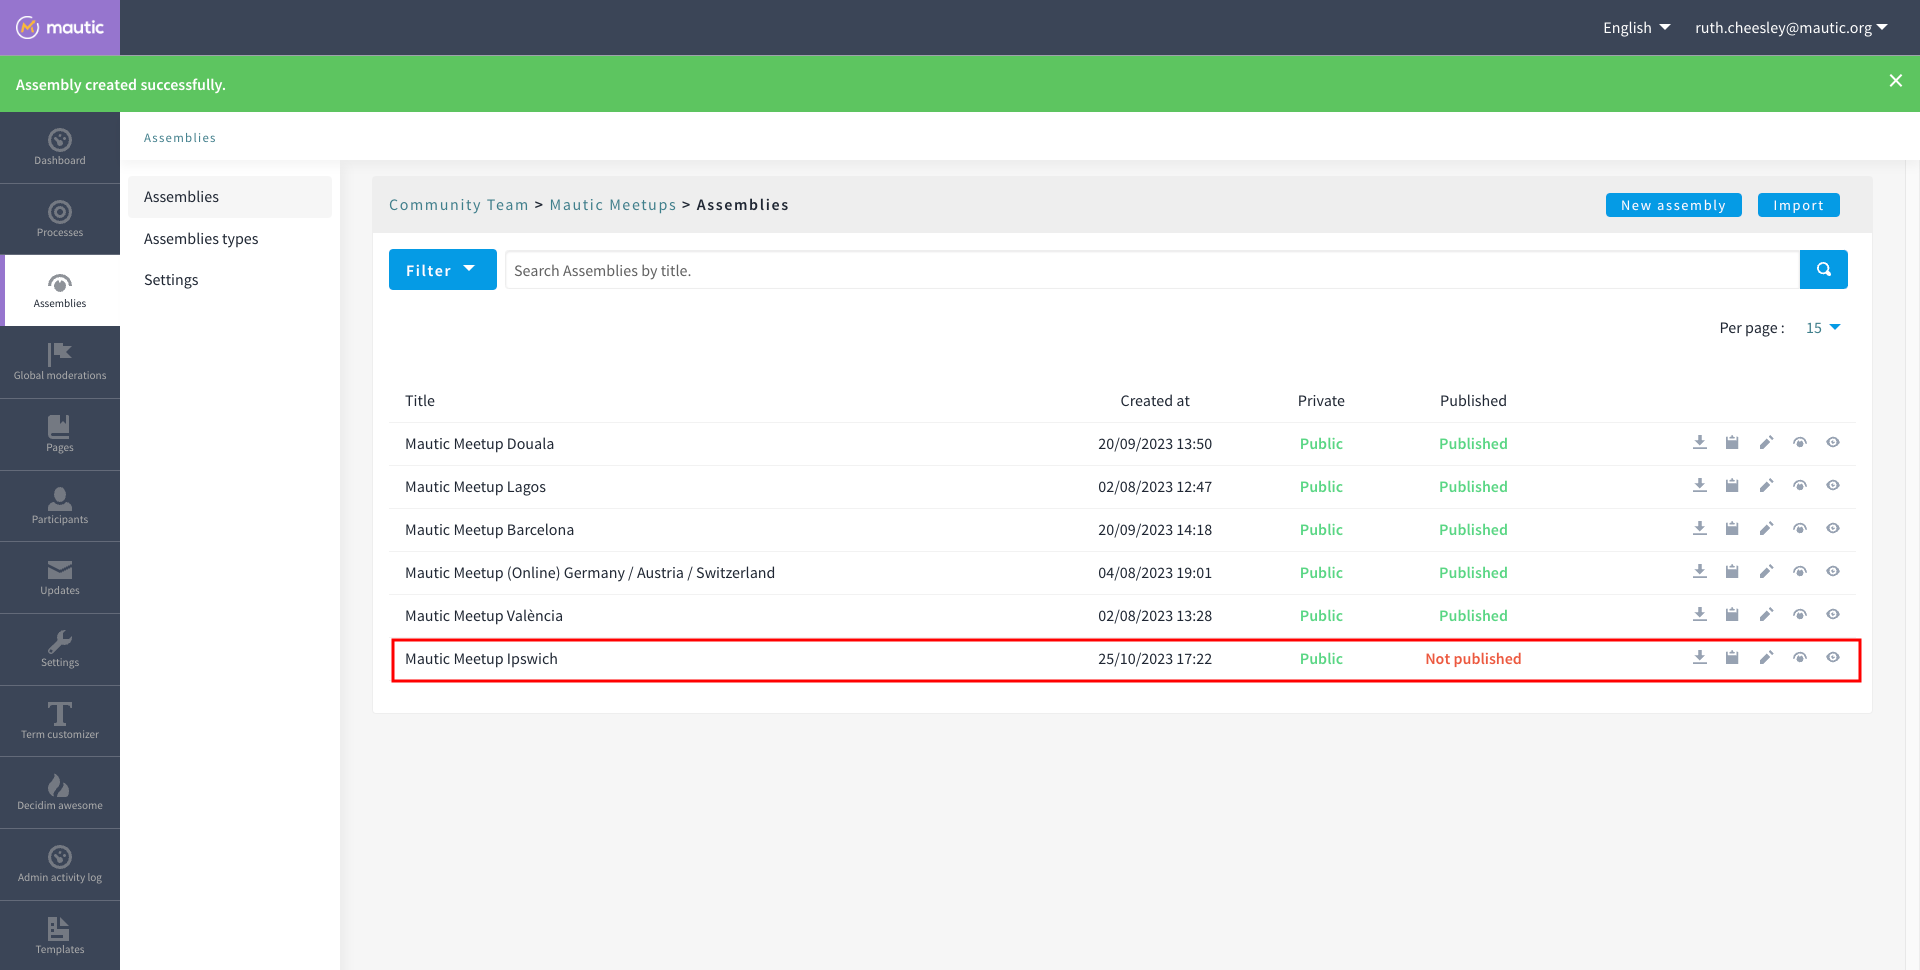
Click the pencil icon to configure the assembly.
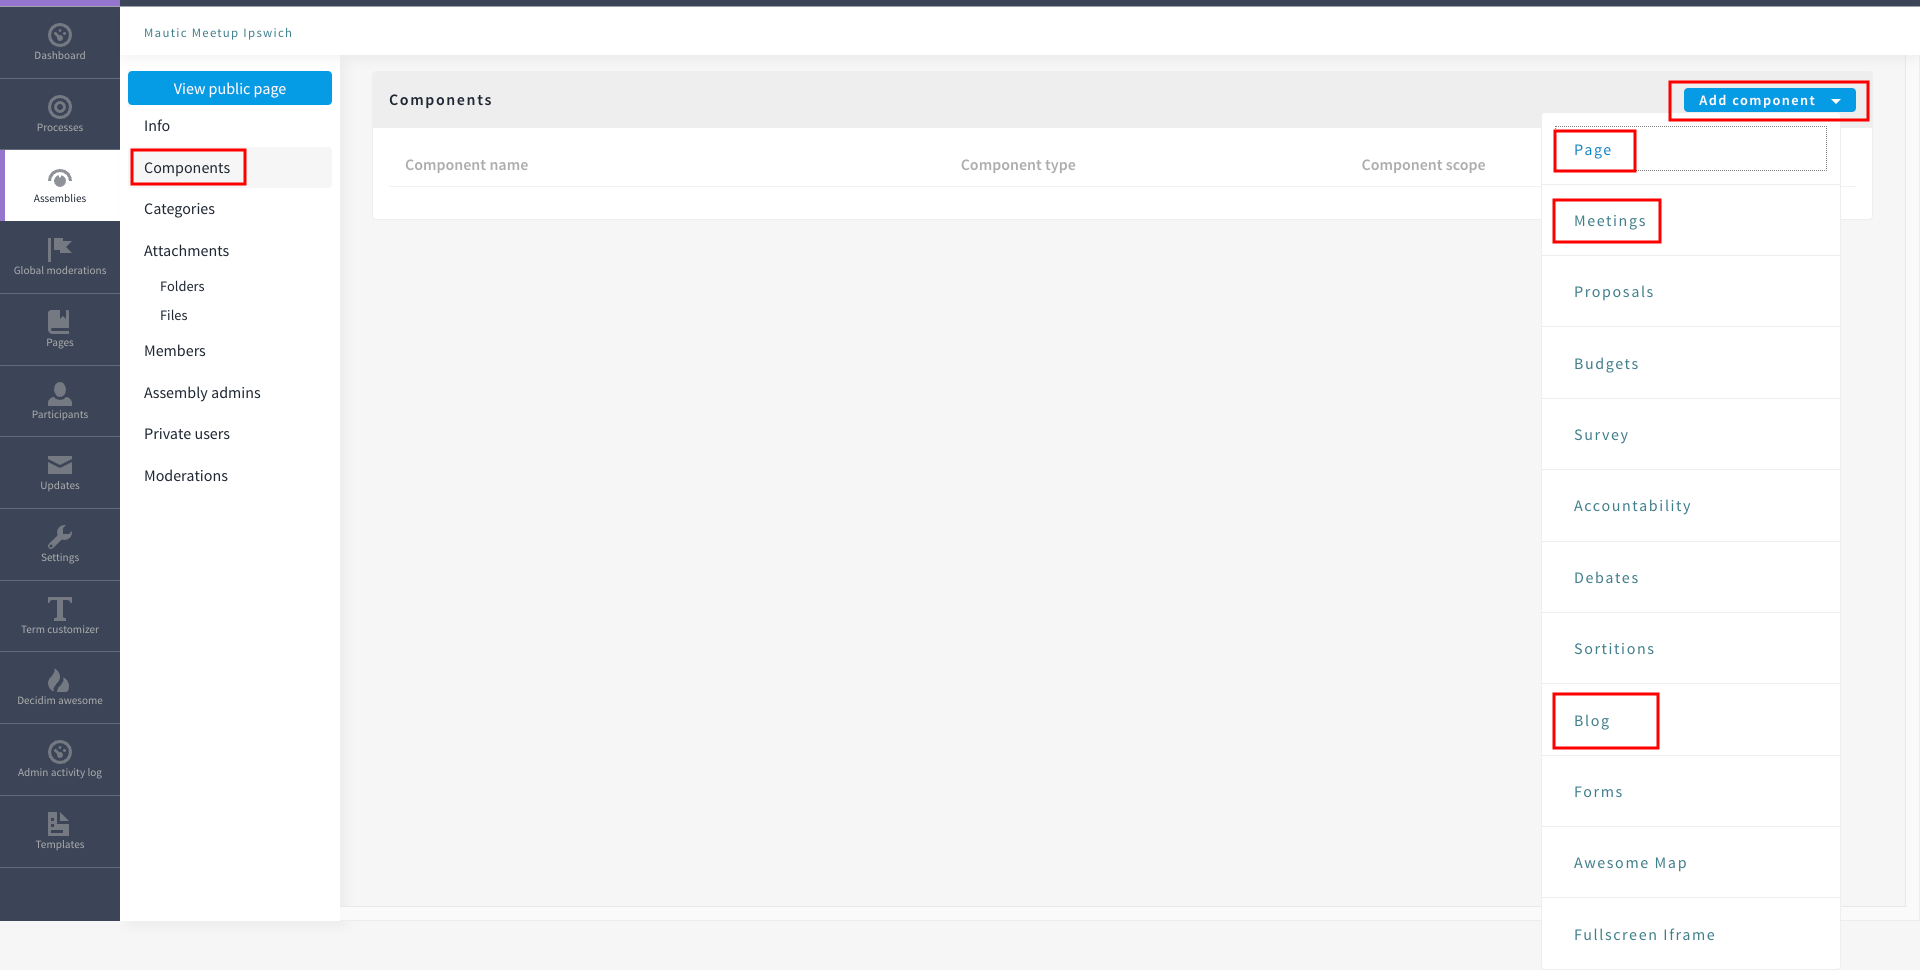
Add the components you require by clicking on
Components > Add Component. Generally, most assemblies require:Page: to explain in more detail what they do
Meetings: for online/hybrid/in-person meetings
Blog: to communicate with the community what your assembly is doing
Add the Lead, Assistant Lead, and any contributors under the ‘Members’ section by searching for the existing user. Note that you can also create your own role name using ‘other’ as the option when selecting a role.
If you want people to be able to become a member of your assembly without you needing to manually add them, you can create a group which they can join, automatically granting them membership to your assembly. Check the documentation on groups for how to create them, and then add the group in the ‘Members’ section as previously described.
Add any assembly admins. This gives the user full administrator rights over only this specific assembly. You need to know the email address they use, which you can find via
Admin panel > Participants > Participants > Show email address. The ‘Show email address’ icon resembles an open envelope.Once configured, go to ‘Info’ on the left menu when configuring the assembly, and click the ‘Publish’ button at the very bottom of the page.
If the assembly is private, you’ll need to invite members in the ‘Private Members’ section, once published.
Assembly types
Currently, the following assembly types are available:
Team
Working group
Tiger team
Governance
Meetup group